HR Administrators Guide
A Guide to using the portal as an HR Administrator
This is a comprehensive guide built for HR Administrators to help you to understand and navigate the portal. This guide will cover all of the information that you will need to know to effectively use the portal. HR Administrators have almost full access to all the portal, the below sections will help you get around.
Contents:
- Dashboard
- Profile
- Adding Users
- Changing Passwords
- Creating Teams
- Assigning and Removing Members
- Leave Requests
- Leave Balances
- Leave Calendar
- Managing Work Codes & Job Codes
- Timesheets
- Hours Audit
- Pay Advice
- Administrator Reports
- Maintaining Transaction Types
- Exporting
- Setting a Company Message
Usability of the portal
As an HR administrator, you have access to the entire functionality of the portal, this includes the ability add new users to the portal, provided that you are doing your payroll in-house, change work codes, setting transaction codes, etc. The full extent of what you can do is listed below:
What you can do as an administrator:
- You can add new users on the portal*
- View and manage your payslips
- Create and manage existing teams
- Create reports
- View the weekly hours audit
- Create, update and manage transaction types and timesheets
- Change the company messages
- Export files from the portal to your payroll system
- View the weekly team calendar and contact details
- View leave request charts
- Change passwords for users of the portal
*Small note about adding users:
If your portal site is managed by your payroll provider, then the option to directly add new users may not be available if your payroll is outsourced, as it is managed by the payroll system.
The Portal Dashboard
The dashboard is the main hub for all of your portal shortcuts, it shows a brief amount of information on the actual page, pertaining to useful segments, such as contact information for all users, as well as a calendar showing when users have applied for leave, and lastly, your most recent activity throughout the portal.
The dashboard header and sub-menus

This is the header of the dashboard, it contains quick links to every major section of the portal, simply clicking on one of these will redirect you appropriately. Also at the top is a small subsection in the top right corner, this contains the following:
- Notifications - These will notify of any requests being made on within the portal.
- Help - This will give you direct access to the help site, as well as quick links the the main guides for portal users.
- Settings - This contains links to the other areas of the portal, detailed below.
- Profile - This gives you the option to change your profile options or to log out.
Settings
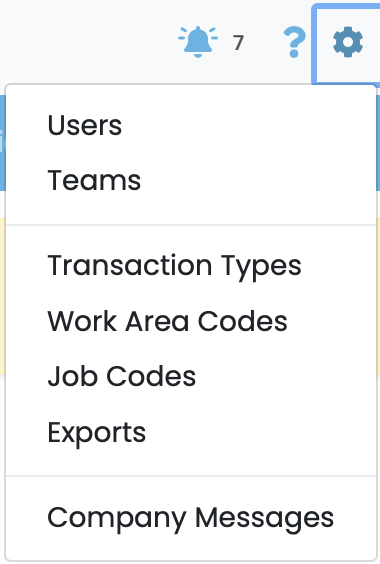
This is the drop-down menu that shows up when you click on the settings icon. This is where you can setup and manage users and teams, as well as create and maintain transaction codes, work and job codes, exporting and editing company messages.
The main dashboard
These following segments are the bulk of the dashboard, showing a range of information, either regarding the activity you have most recently done across the portal and a weekly calendar as well as the contact information for all users on the portal.
Recent Activity

The activity section will outline when a few select actions were last updated, these contain a selection of the most used areas on the portal, and will update appropriately whenever action is taken.
- Last Login - Shows when you last logged in.
- Leave Balances Updated - Shows when the most recent leave balances were updated.
- Last Leave Request - Shows when the last leave request was.
- Last Timesheet - Shows when the last timesheet was.
- Pay Advice Updated - Shows when the last pay advice was updated.
Weekly Team Calendar

The weekly team calendar is a small tool to show you upcoming leave being taken by yourself and members of the portal. You can also cycle the dates at the top to check upcoming weeks to see if any leave has been requested. Also contains a search bar if you need to search for somebody specifically.
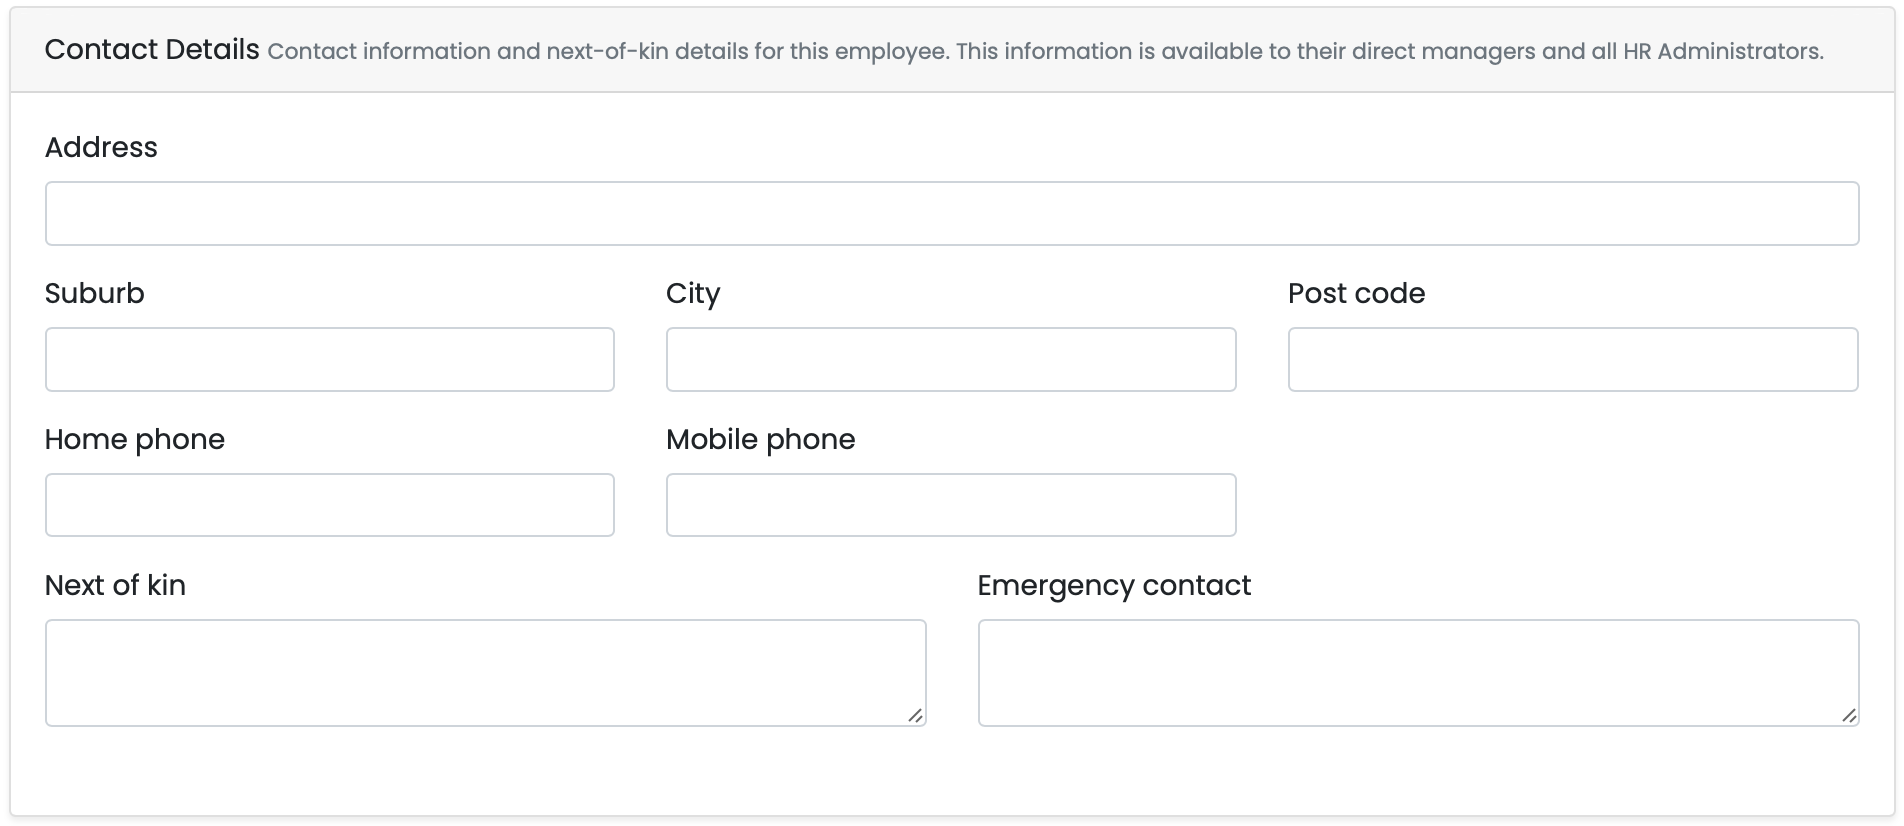
Contact Details
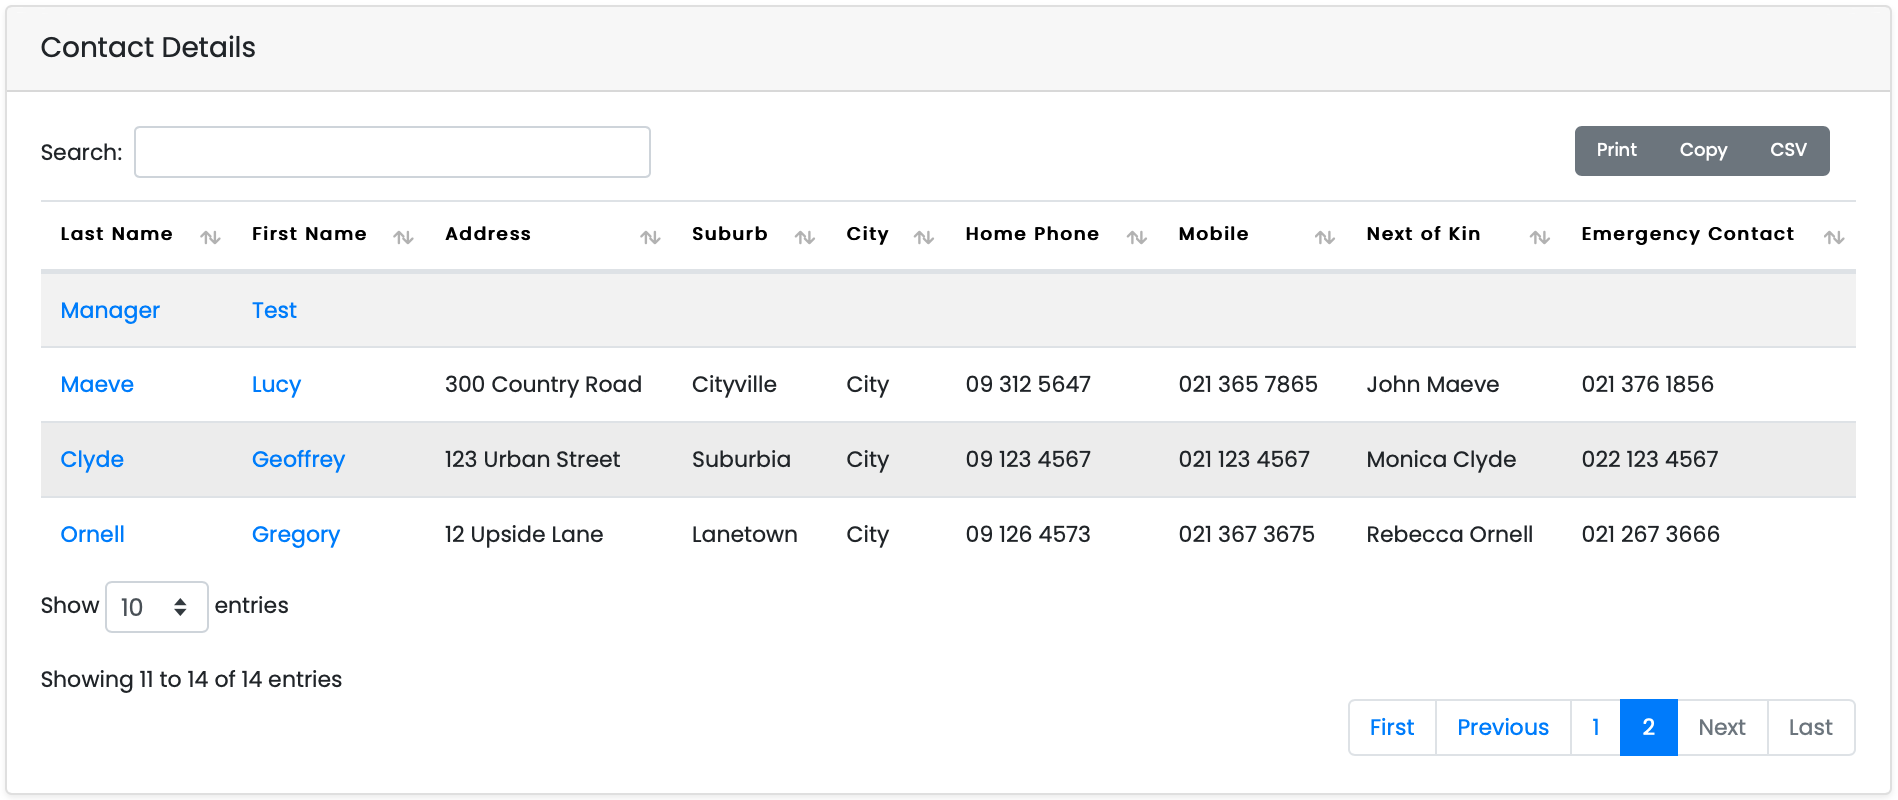
The contact details box at the bottom of the page will list all of the users on the portal with their respective contact information, such as address, phone number, next of kin, etc. This also contains a search bar if you need to find contact information about a certain person.
Profile
The profile page is where you can change some of your personal information, as well as being able to change your contact information, and whether you want to enable sending multiple requests at the same time, instead of one by one.
Edit user
- This first screen is for changing your email address, should you need to, changing your password and turning on the ability to send multiple requests at the same time. The rest of the options are greyed out due to only being able to be entered once, which is when users are initially setup.

Contact Details
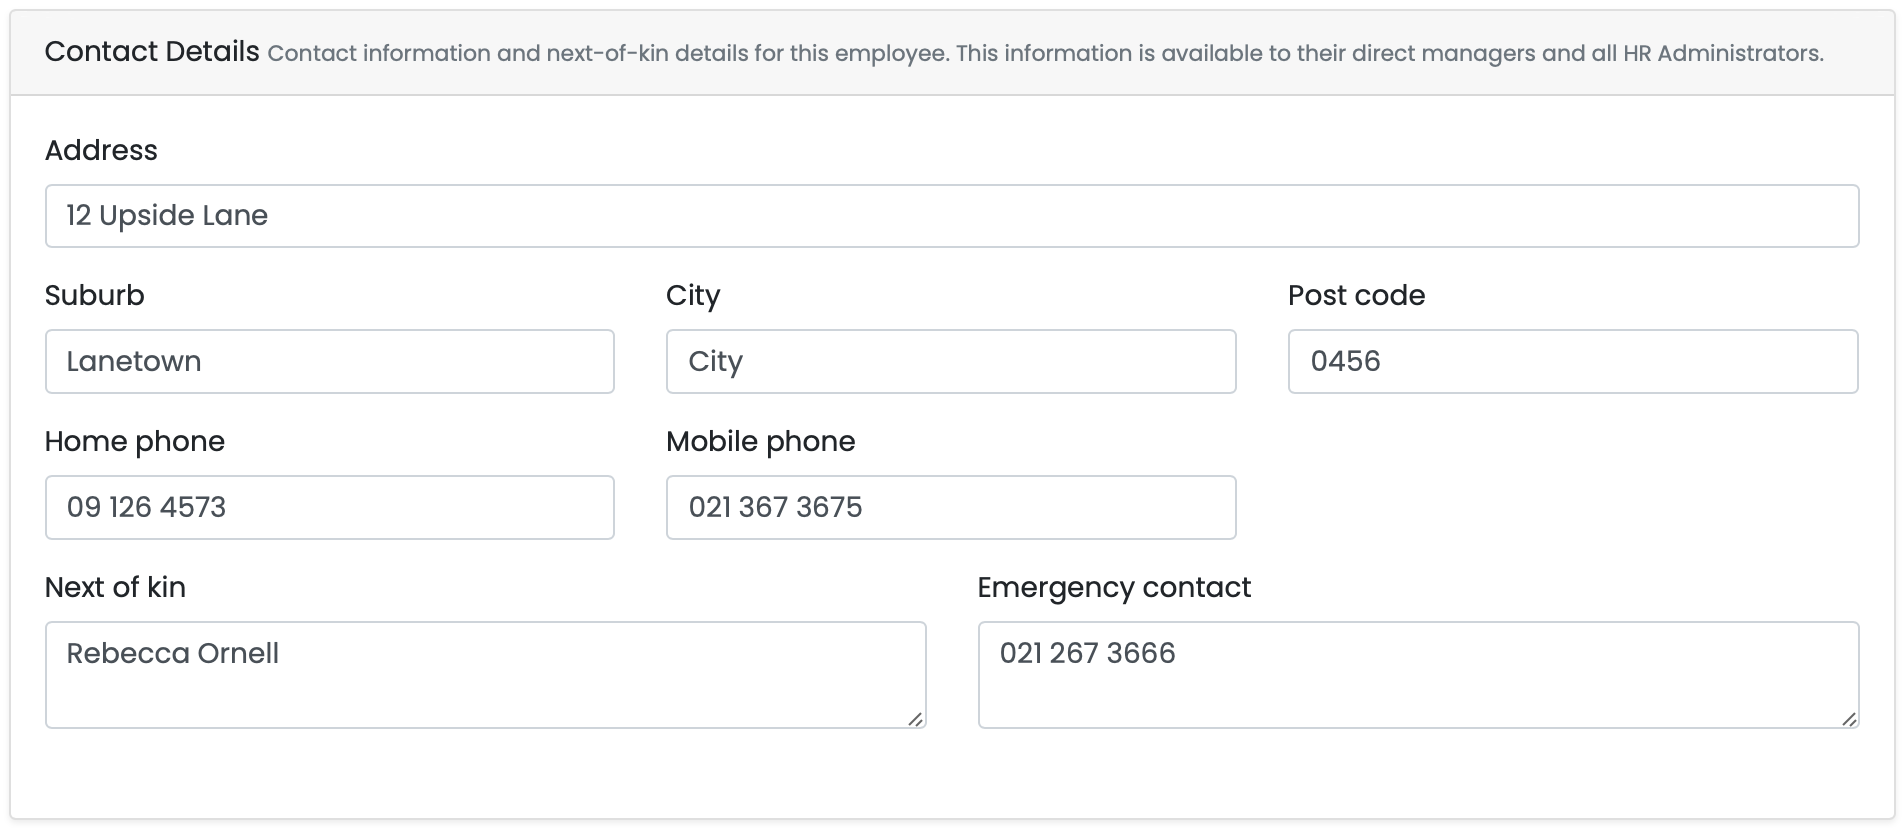
- This next screen is for changing all of your contact details, it contains all of the required fields to be able accurately update your changes.
Preferences
- This small box is for changing your personal preferences, such as your default home page when you open the portal, as well as the default tabs of all of the major pages on the portal.

Users and the ability to add new users
This feature is structured a little differently to the rest of the site, wherein, you can only add new users to the portal if you are doing your payroll in-house. If you currently outsource your payroll to a provider, then they will add the users to the portal themselves. Nevertheless, this screen is dedicated to bringing new users into the portal.
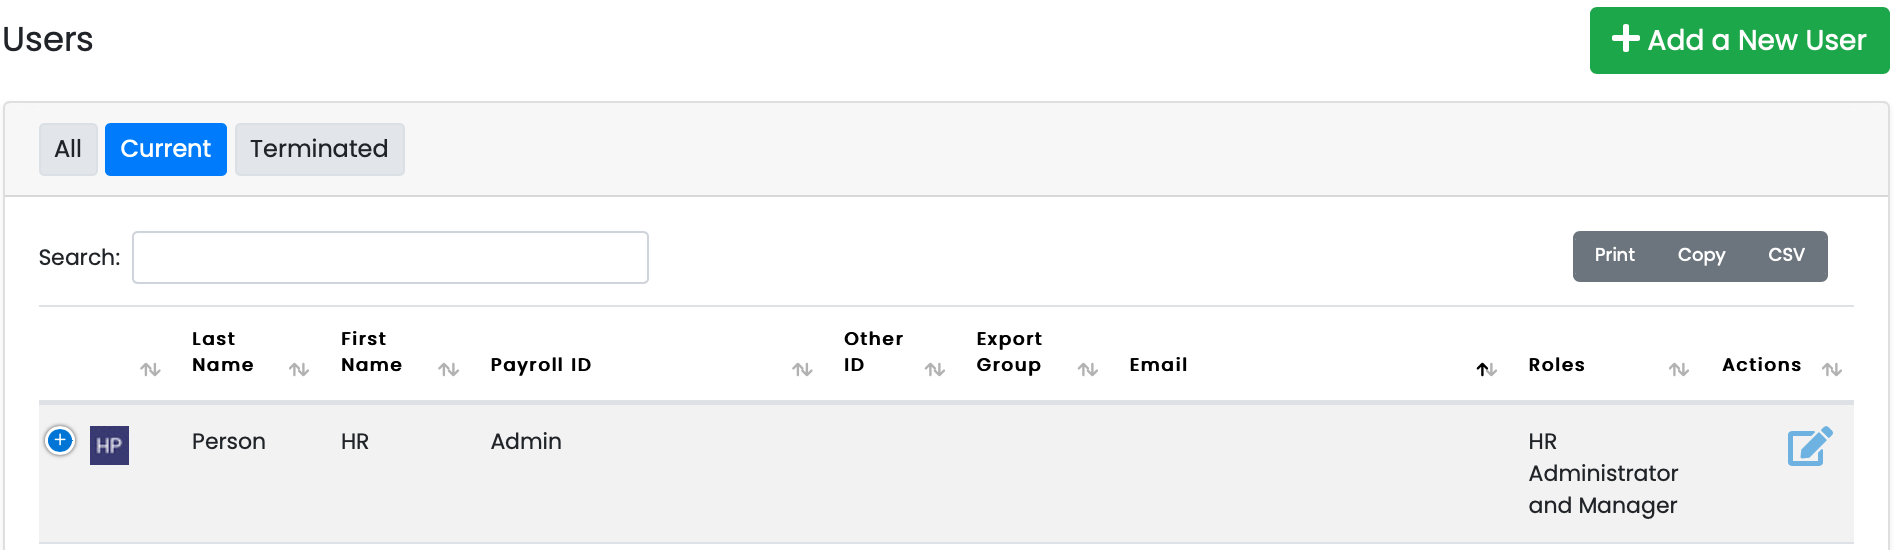
This is what the users screen looks like, this will show you a breakdown of all the employees currently using the site, with information like their names, payroll identification, export groups if they have one, their email address and roles. There is also an edit action on the right in the event that you need to change any information about particular employees.
You are also able to use the search bar to find particular users, as well as cycle through any employees that have been terminated.
Adding a new user.
To add a new user, provided you are able to, simply click on the green button in the top right hand corner of the screen, this will move you over to the following screen:
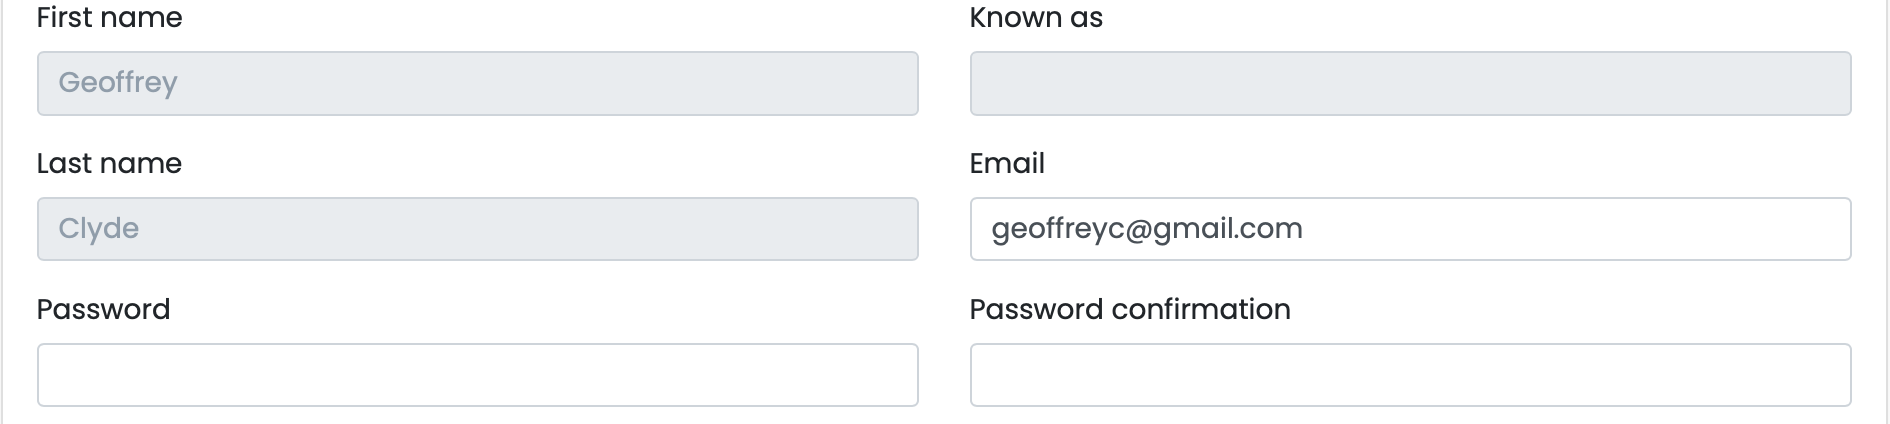
This first segment is where you enter the integral information for your employees when creating them in the portal as users. You enter their username or their payroll code, depending on how you want them to be shown, and another payroll code if they have one.
After that you can enter their name, email address, password and work area if they have one. You can also choose whether their leave requests will get sent individually or as a group if they apply for more than one.

Contact details
- The next segment on the page is where you enter the contact details of the user, such as address, phone numbers, next of kin and their emergency contact number. The information entered here will be shown on the main dashboard contact details, just with slightly less information.
Preferences
- This box is for setting the default tabs and home page for the users for when they log in.
Roles
- The next box is only relevant if you are setting up a new HR Admin or an external user, as these are the only two options available.

Rostered hours and terminated users
- These last two boxes, at the bottom are for a couple of things. The first applies to current employees, and that is if they end up being terminated, you can click on the slider bar and it will set that user as terminated.
- The second function is managing the roster of portal users. All you have to do here is enter the default hours per day, and fill in the hours on the days that they work. The other part of this box is the option to state transaction types attached to days worked, which is done via the drop down boxes.

Changing Employee Passwords
If you are required to change an employees password, this can be done by clicking on the gear icon next to your name and then clicking on the users button, which is also the screen from above.
After clicking on the users button you will be on the manage users screen, once here, click on the pencil icon next to the employee's name, this will allow you to edit their details.

Once you have clicked on this icon, scroll down the page a small bit, halfway through the first box you'll see the option to change the users password.
Simply enter the password here twice, once in the password bar, and again in the password confirmation bar. Once done click on save changes at the bottom of the page. All that's left to do is notify the user their password has been changed.
Creating Teams
Teams are an easy way to define the users on the portal, grouping users into specific categories depending on their role in the company. To get to the teams page, simply open the settings menu, small gear icon next to your name at the top of the page, and click on the teams button.
This will lead you to the teams overview screen, where you can see all of the currently created teams, as well as their members. The screen will look as follows.

You'll see in the screenshot, the name of the team, members and managers, it will also show the role of any members in the team, bracketed beneath their name. You have a couple of actions too, you can edit the teams, which allows you to change any of the pre-existing information regarding the team, you can also the delete the team, in the event the users no longer exist or the team needs to be disbanded.
To create a new team, click on the green button in the top right hand corner, this will redirect you to the team creation page, which will look as follows.
Team creation and assigning members
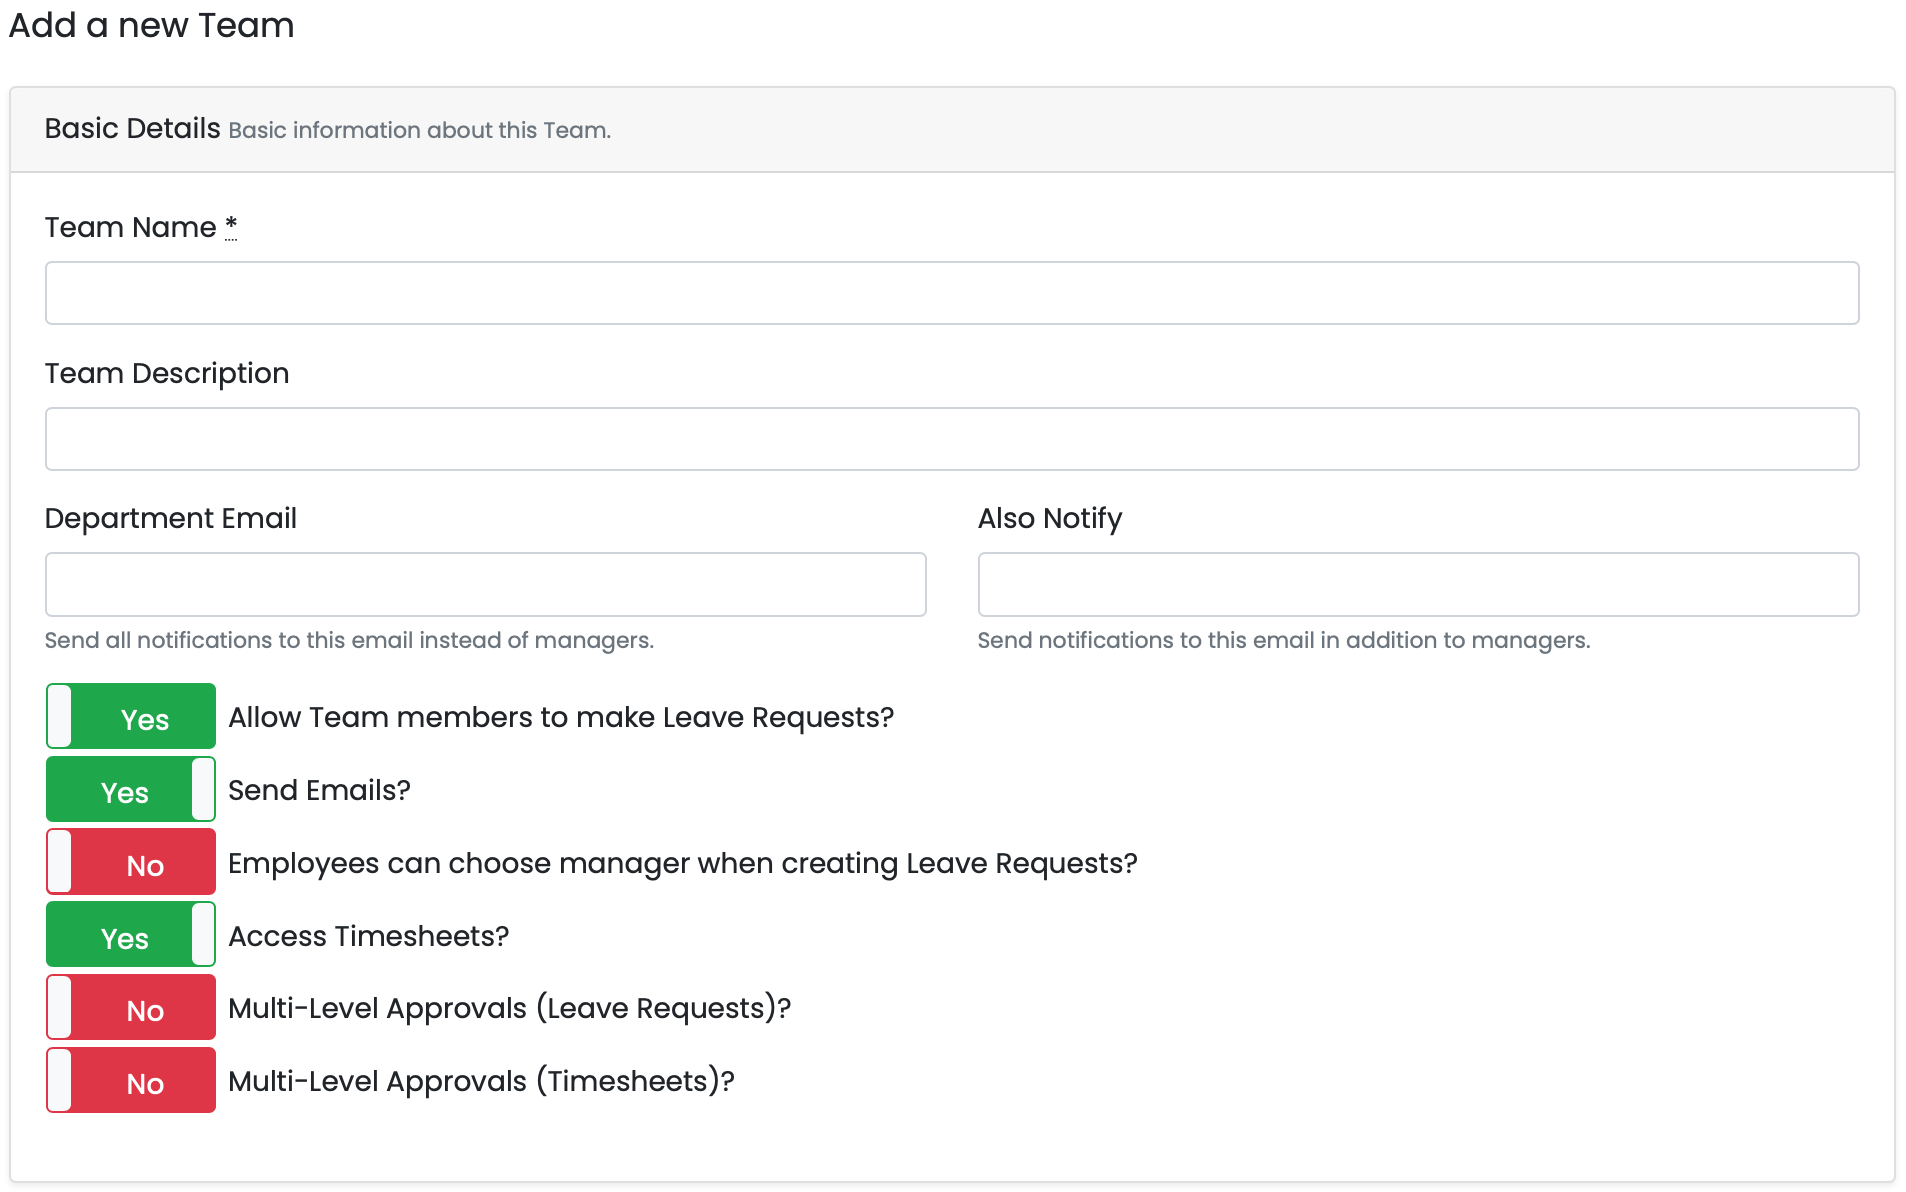
Basic Details:
This segment is for the basic details of the team, such as team name, the description, if they have one, department email and another email address bar, if you want emails to go to a separate email address, in addition to the team managers. Beneath this is a series of toggle bars:
- Allow team members to make leave requests?
- This option is for choosing whether team members can apply for leave requests or not.
- Send emails?
- This option is for choosing whether team members are permitted to send emails.
- Employees can choose manager when creating leave requests?
- This option is for allowing employees to select a specific manager to send leave requests to, if there is more than one
manager to choose from. - Access timesheets?
- This option is for allowing team members to access and create timesheets.
- Multi-level approvals (leave requests)?
- This option will allow the option for multi-level approvals of leave requests, wherein, a manager doesn't take action on
a leave request fast enough, will escalate the request to the next manager, permitting there is more than one manager in the
team, otherwise it will be escalated to HR. - Multi-level approvals (timesheets)?
- This option will allow the option for multi-level approvals of timesheet requests, wherein, a manager doesn't take action on
a timesheet request fast enough, will escalate the request to the next manager, permitting there is more than one manager in
the team, otherwise it will be escalated to HR.
Adding and removing team members
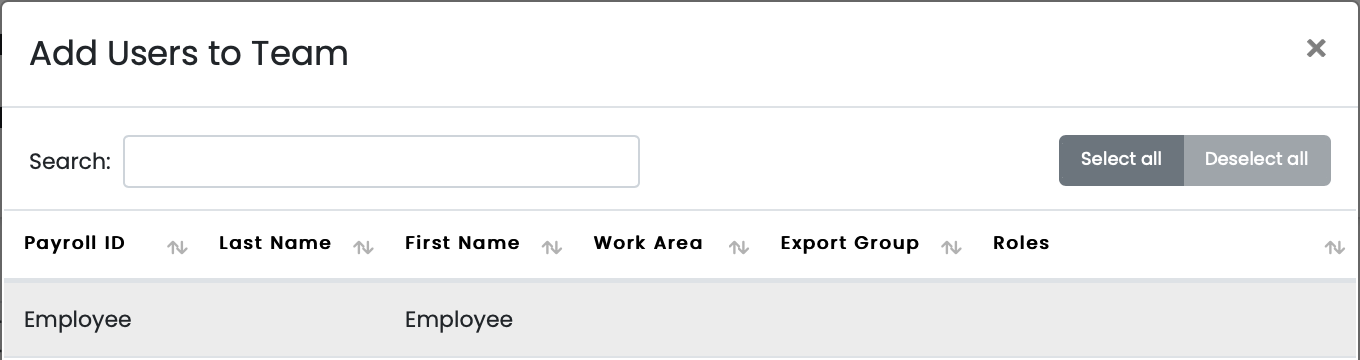
When adding users to a team, all you need to do is click on the green button, this will bring up a different sub-menu, located below this screenshot. All you need to do is scroll through the list and add any users you want to add to the team. Alternatively, if you need to remove team members, simply click on the user, so they are highlighted, then the red button to remove the selected team member from the team.

- This is the menu that gets brought up, scroll through here to find the users you want to add.
Adding managers
Adding managers has a little bit more involvement than adding users does. To add managers to your teams, you can have more than one manager per team, click on the box with 2 small arrows on the left. This will open a drop down menu with all available managers, simply select the manager(s) that you want in the team.
Within these same categories, you have their company email address, how many days after leaving a request unconfirmed that it gets escalated, whether or not they have the right to approve leave and timesheets, and their order of priority, mainly if you have more than one manager in the team.
If you need to remove a manager for whatever reason, just click on the red bin icon on the right. Once you have entered all the information, click. on the save changes button.

Leave Requests
As an HR Administrator you will be able to see all leave requests, whether they be current, approved, declined, etc, made by your team, yourself as well as other members. You can also see escalated requests on this screen, indicated under the status column.

This is also the screen you use to apply for leave, using either of the options at the top of the page, will direct you to the following pages.
Applying for Leave
Full Day:
- This first details box is where you enter the person you want to send the leave request to, the transaction type you are requesting, and a comment, if necessary. Your name will be automatically entered when you enter this screen.
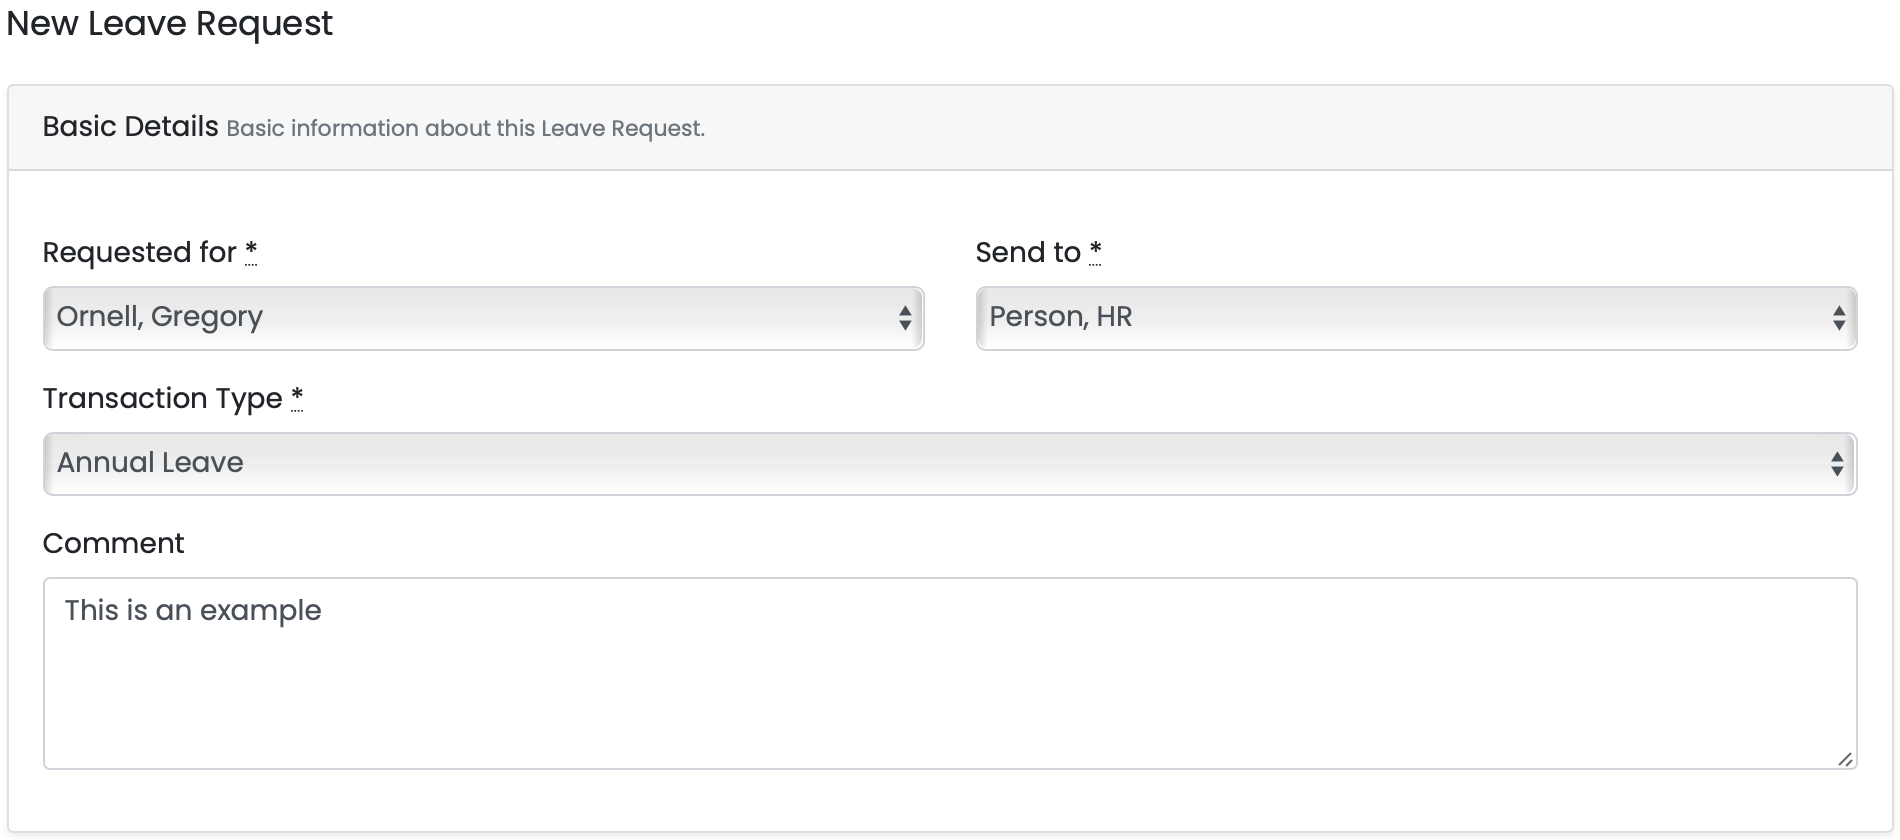
- The next screen will show you your available leave balances.

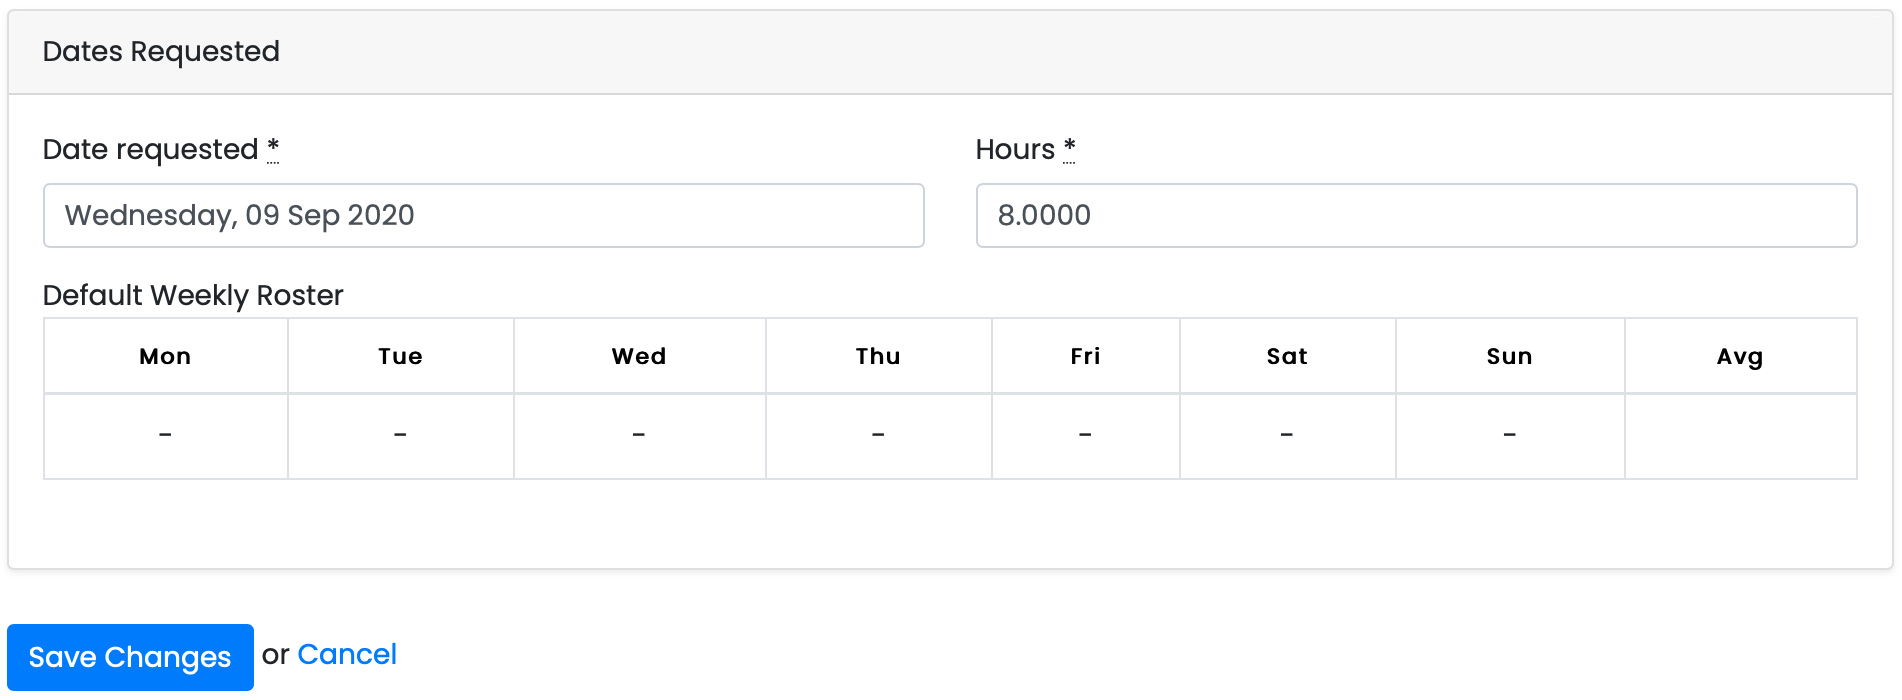
- The last screen is a calendar, this is where you enter your selection of dates that you are applying for leave for, simply select your start and end date and the system will take care of the rest. Once you are done, click on the save button and this will send your request to the selected person.

Part Day:
The only difference between applying for a full day of leave and part day is the final box. Where instead of selecting all the days you need, select the single day, and the amount of hours you need taken from that day. Once you have done this, click the save button to send the request.
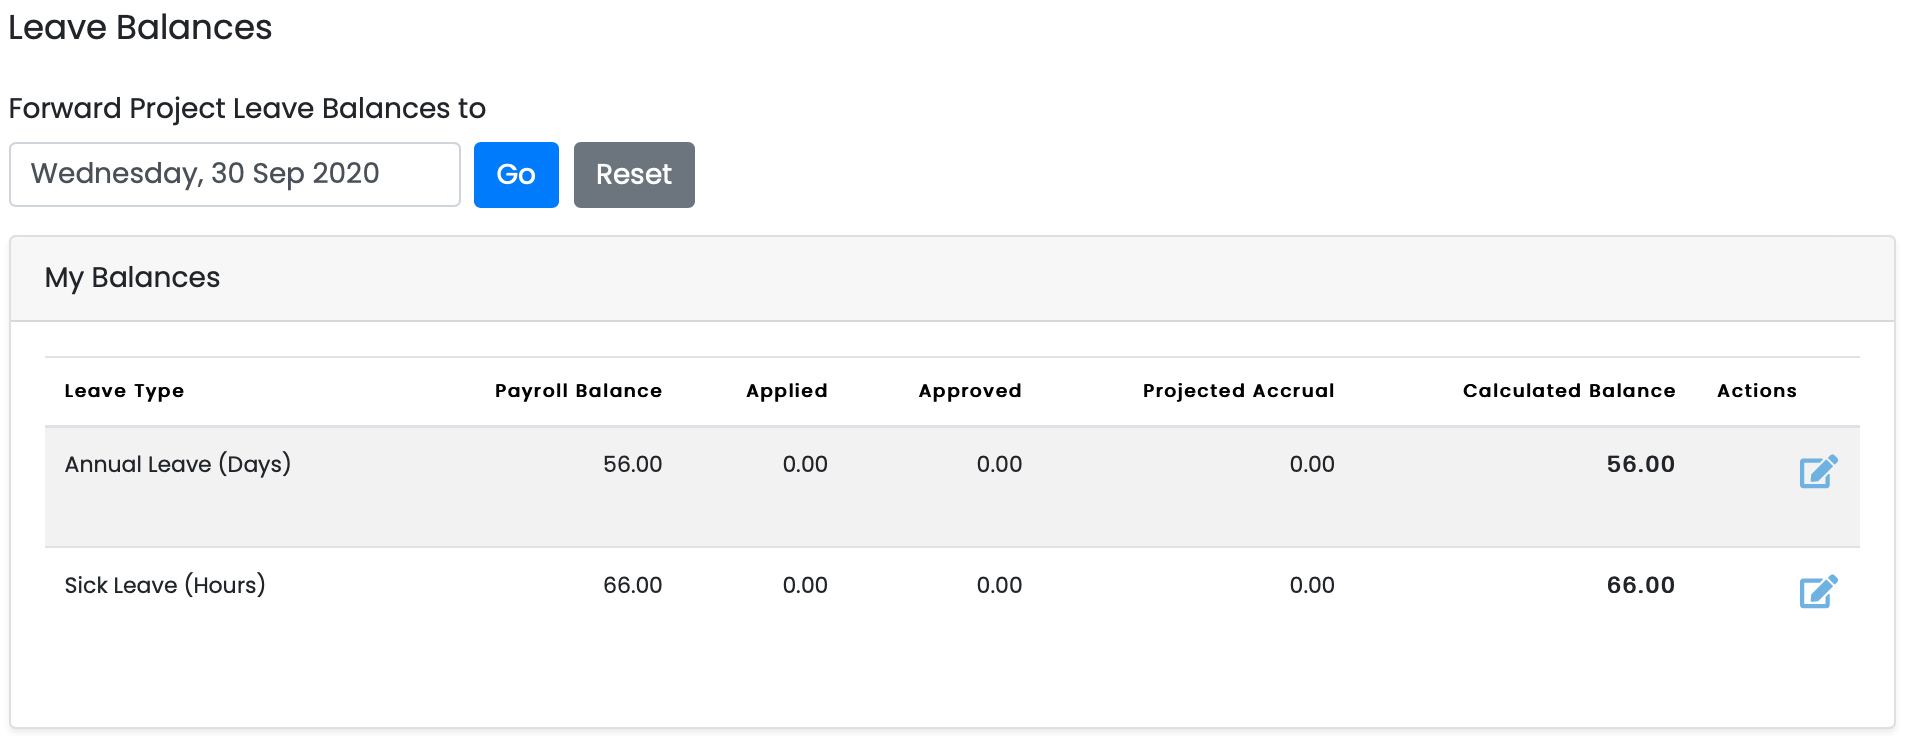
Leave Balances
The leave balances page is where you can view all of your leave balances. The top section will show you your available leave balances, as well as any leave that has been applied or approved. You can also choose to show projected leave, by entering in a date into the bar above the table, you will generate a new column that will show you how much leave you'll have accrued by that point.
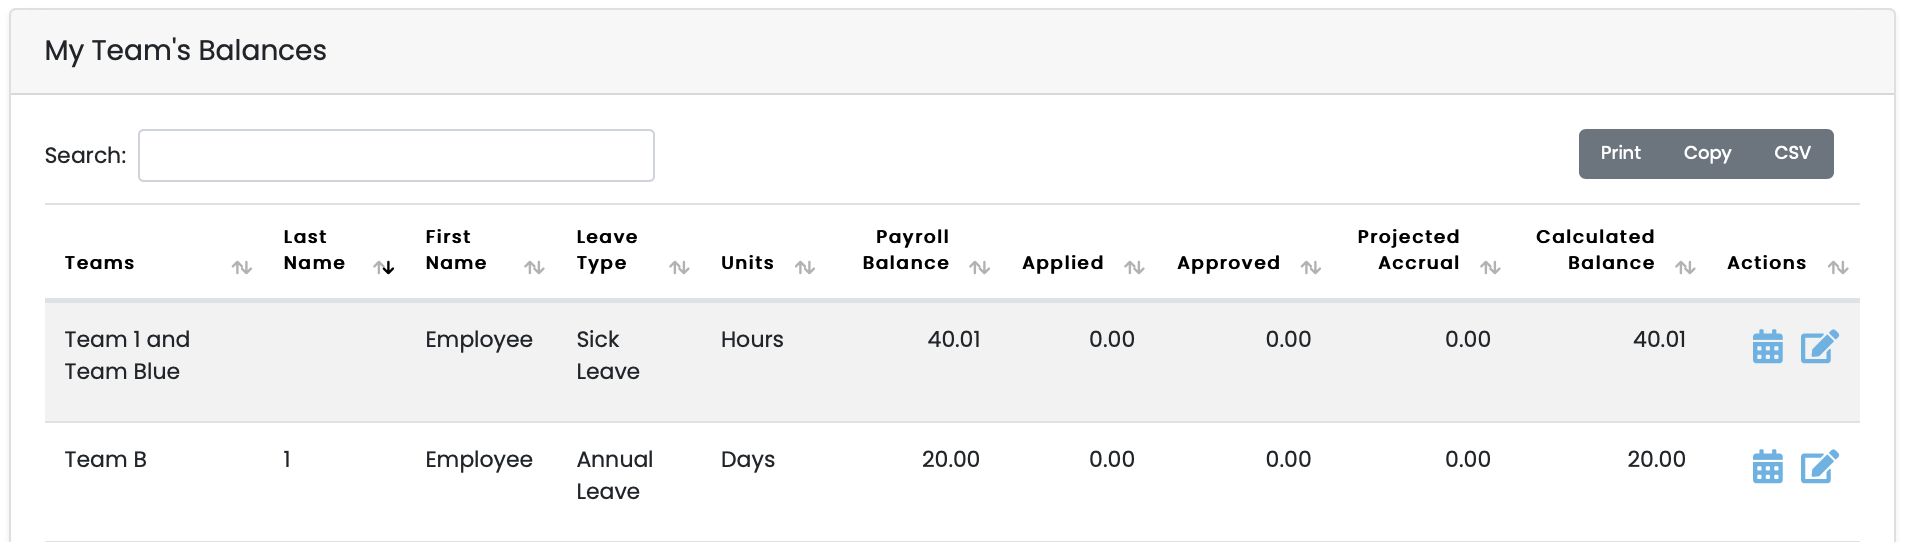
The second section of that page is essentially the same, except it shows you the leave balances of all users on the portal, with a couple of differences. You'll see the team they're in, if they have one, first and last name, and a simplified version of what you see on your own balances. This makes it easy to find specific people and easily read how much of which leave they have.
Leave Calendar
The leave calendar is a tool designed to show you when your leave requests, as well as any users, have been applied for, in a simple and easy to understand manner, this page breaks days up into large chunks where it colour codes the days that have been applied for in different colours to make it easy to identify the state of your leave requests.

Depending on the state of the leave type will depend on the colour of the boxes, for example, green coloured boxes would be signifying that the leave has been either approved or exported, as well as showing you which type of leave was requested, however there is a legend attached to the page to make it even easier for you, which is as follows.

The calendar also contains an extensive filtering system, where you can filter it by whichever category you'd want to use at the top of the page, as well as selecting how many entries are visible on a single page.
You might notice a green button in the top right of the screen called 'Subscribe to Calendar', what this does is opens your calendar on your computer, asks for your permission to attach the link to the portal calendar and from there will feed your portal calendar information to your computers calendar allowing you to set reminders for leave requests should you need to.
Managing and Updating Work Codes & Job Codes
Work Area Codes:
As an HR Admin, you will have access to using and creating work codes. This screen will detail all of the work area codes that you have available within your company. This simply states the name of each of the codes and if they are selectable, you can also edit said work codes on this page too.
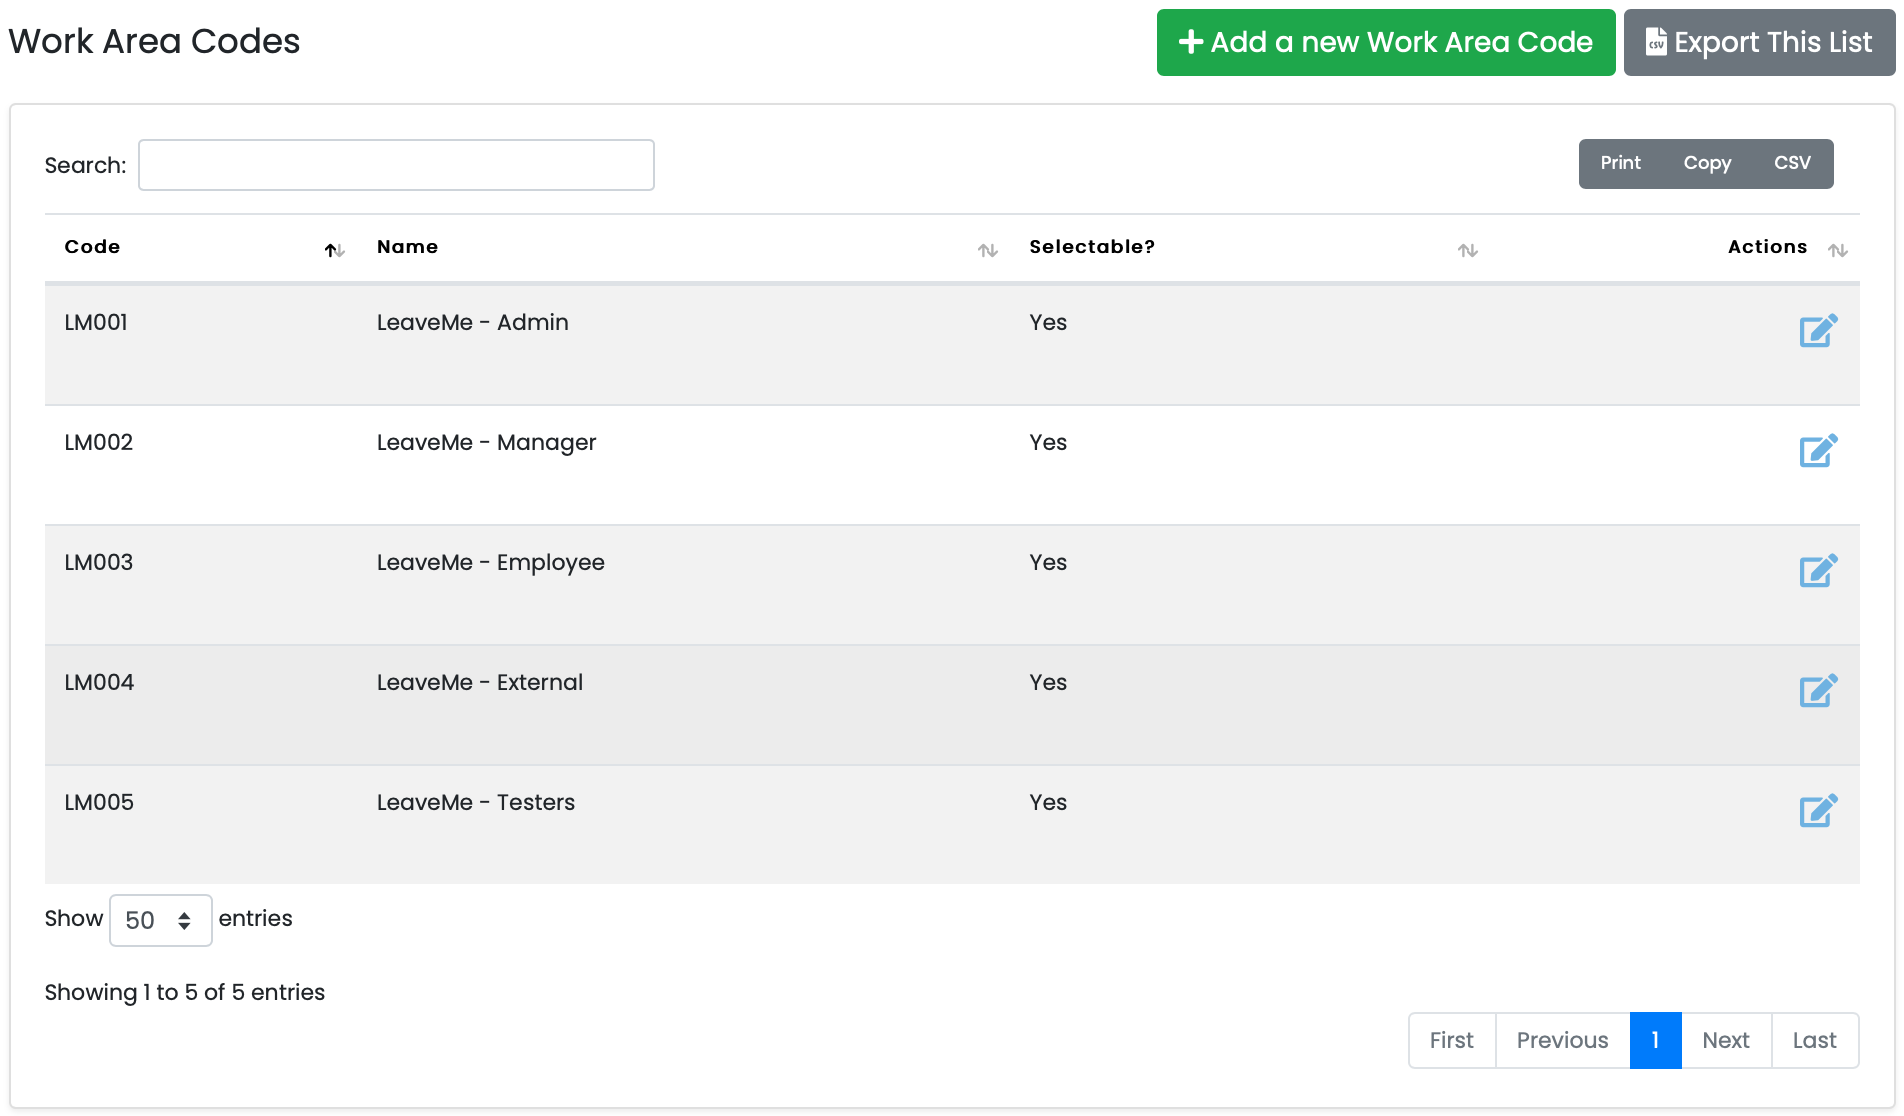
If you are wanting to create a new work area code, click on the green button in the top right of the screen. Clicking on the button will direct you to the following page.
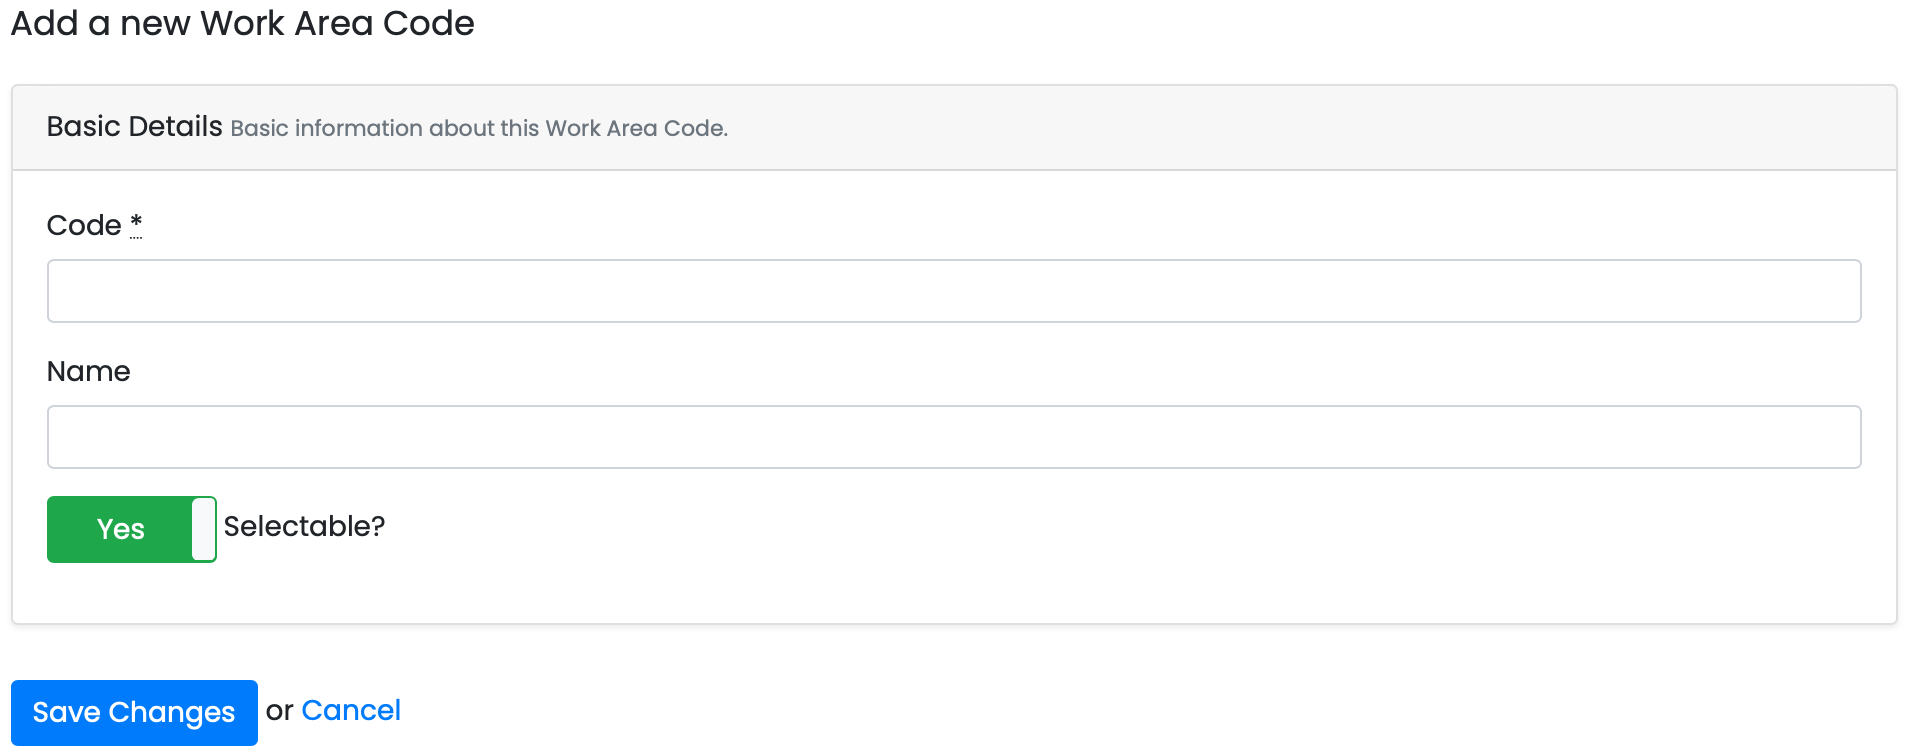
This screen is rather straightforward, only asking you to enter the name or number of the work code, and then attaching a name to it if you wish, once done, click on save changes and you will have added a new code to the system. You can also choose whether this code is selectable or not.
Job Codes
Job Codes are much the same as work area codes, it is simply an easy way of defining users on the portal into adequate job areas, linked to their actual positions.

Adding a new job code is also mostly identical to adding work codes, it simply requires a different code in the top box, once the code is entered, you can save it also as a new job code.

Timesheets
This is the timesheets page. It will contain a table showing all of the relevant information about any requested timesheets that have come through, you can also check any of the timesheets that have been approved, declined, escalated, etc. All of the adjoined pages are accessible by everyone on the portal.
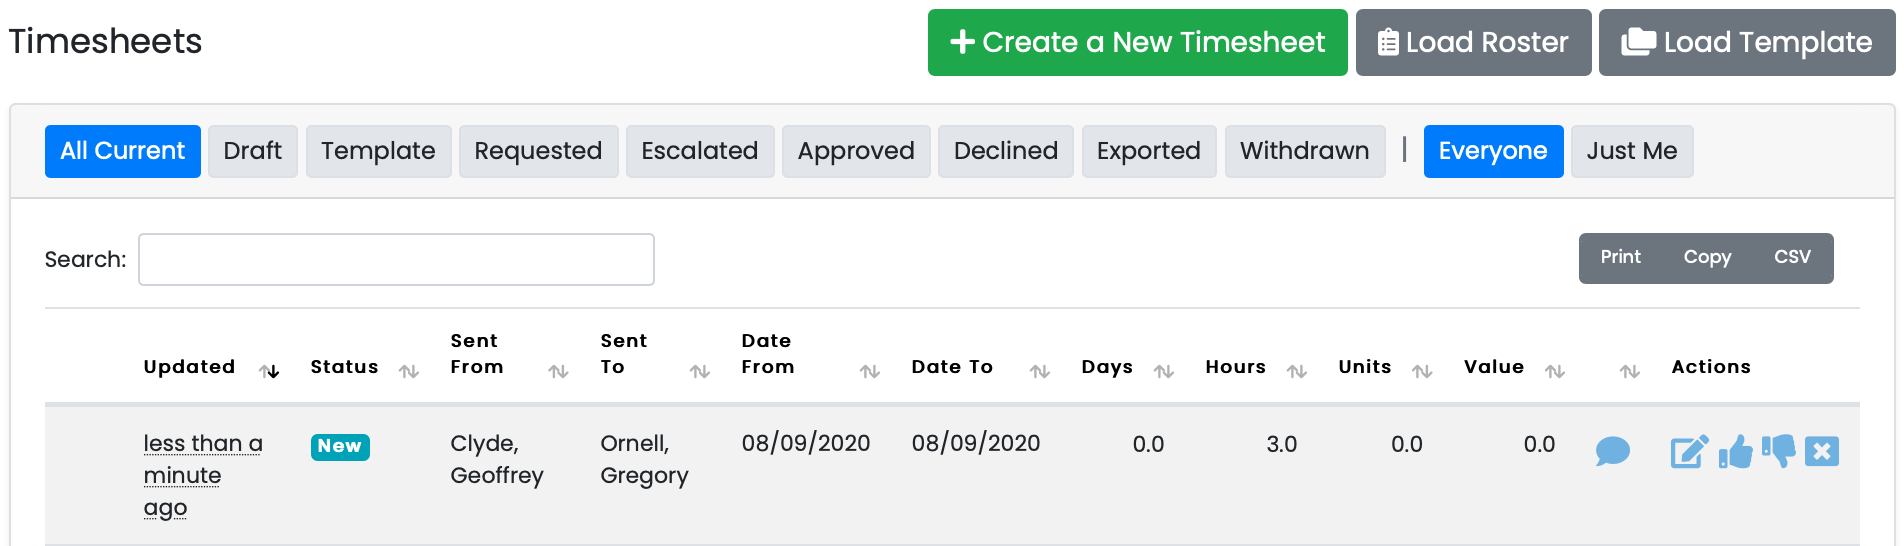
Timesheets are an integral part of the portal, especially as a manager. Timesheets are used for recording requests and transactions that are not classified as a leave requests, such as 'Overtime Hours' or 'Commission Payments', etc.
Inside of this table are various columns that are used to make reading timesheets easier, such as when they were created, the date to and from for the period, total days, etc. On the right side are a few tools that allow you to manipulate the timesheets, such as editing, approving and withdrawing. You can also view any attached comments if there are any, by hovering over the small speech bubble.
Creating a New Timesheet
To create a new timesheet, click on the button at the top of the screen that says 'Create a new Timesheet', this will direct you to following screen.
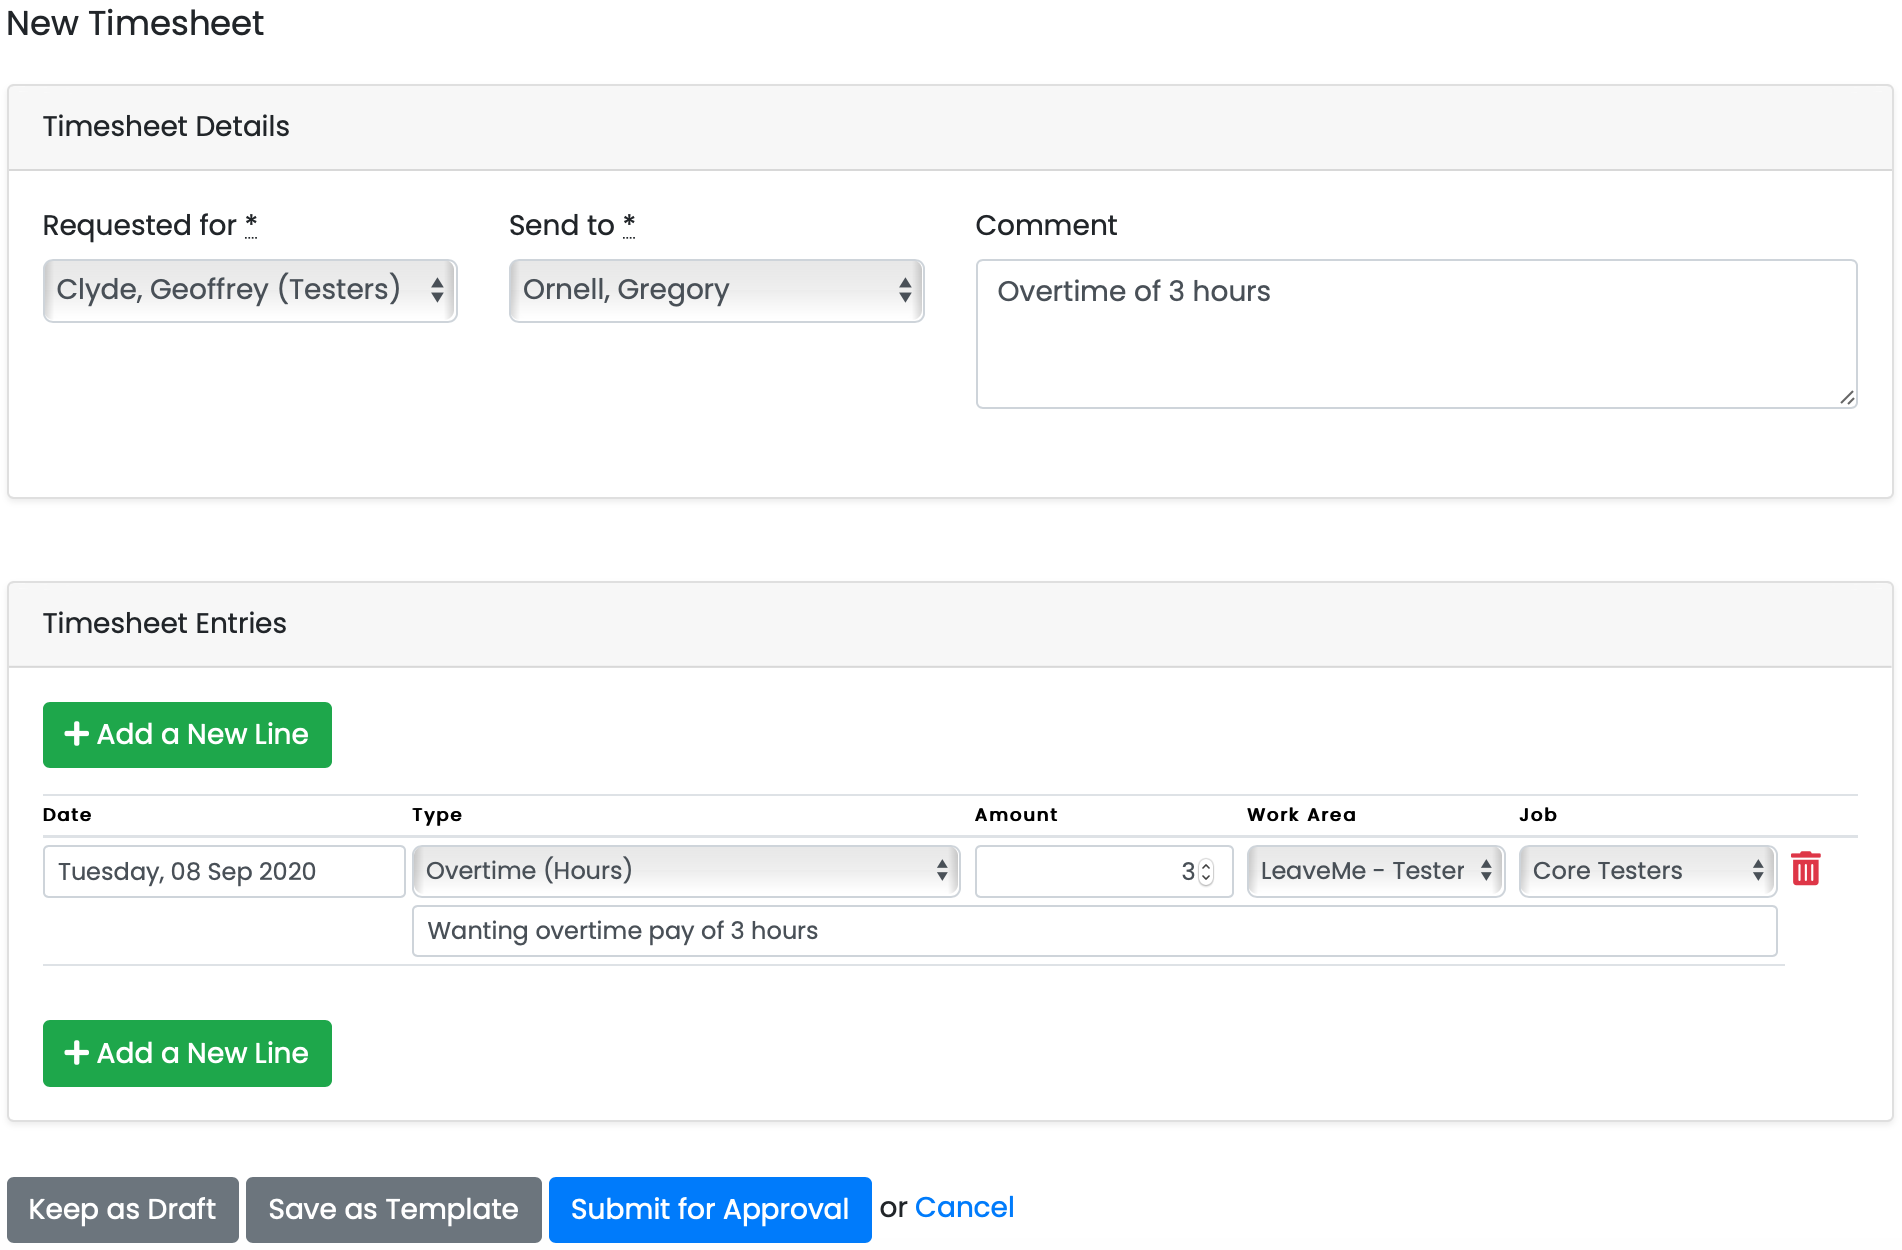
This page is broken up into two different sections. The first half is where you select the person the timesheet is for, in most cases it would be yourself, as well as the person the timesheet is being sent to.
The second half of this screen is the details section. This is where you select the date, the type of transaction, amount whether it be a dollar amount or days, depending on the type of transaction used. You can also add the work area as well as job area. Under those lines you'll find a line that says comment, much like the above one, simply enter any relevant information into this bar.
If you require more than one transaction type for the timesheet, all you need to do is click on the ' + Add a New Line' button, then you can follow the same instructions as before. once you are done here you have a couple of options at the bottom.
Loading from a roster or template.
As shown in the first screen, there are a couple more options, loading from a roster and loading from a template.
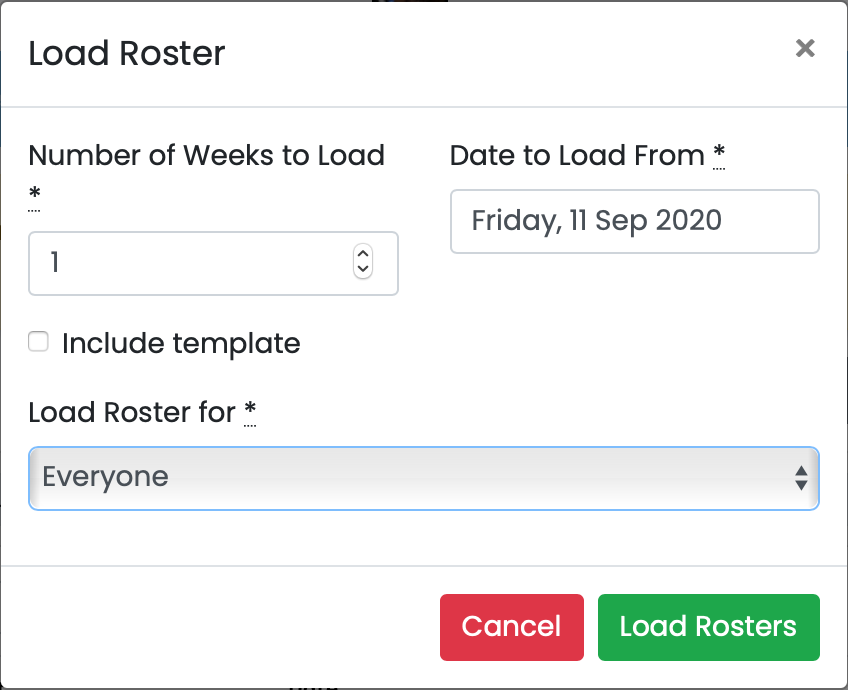
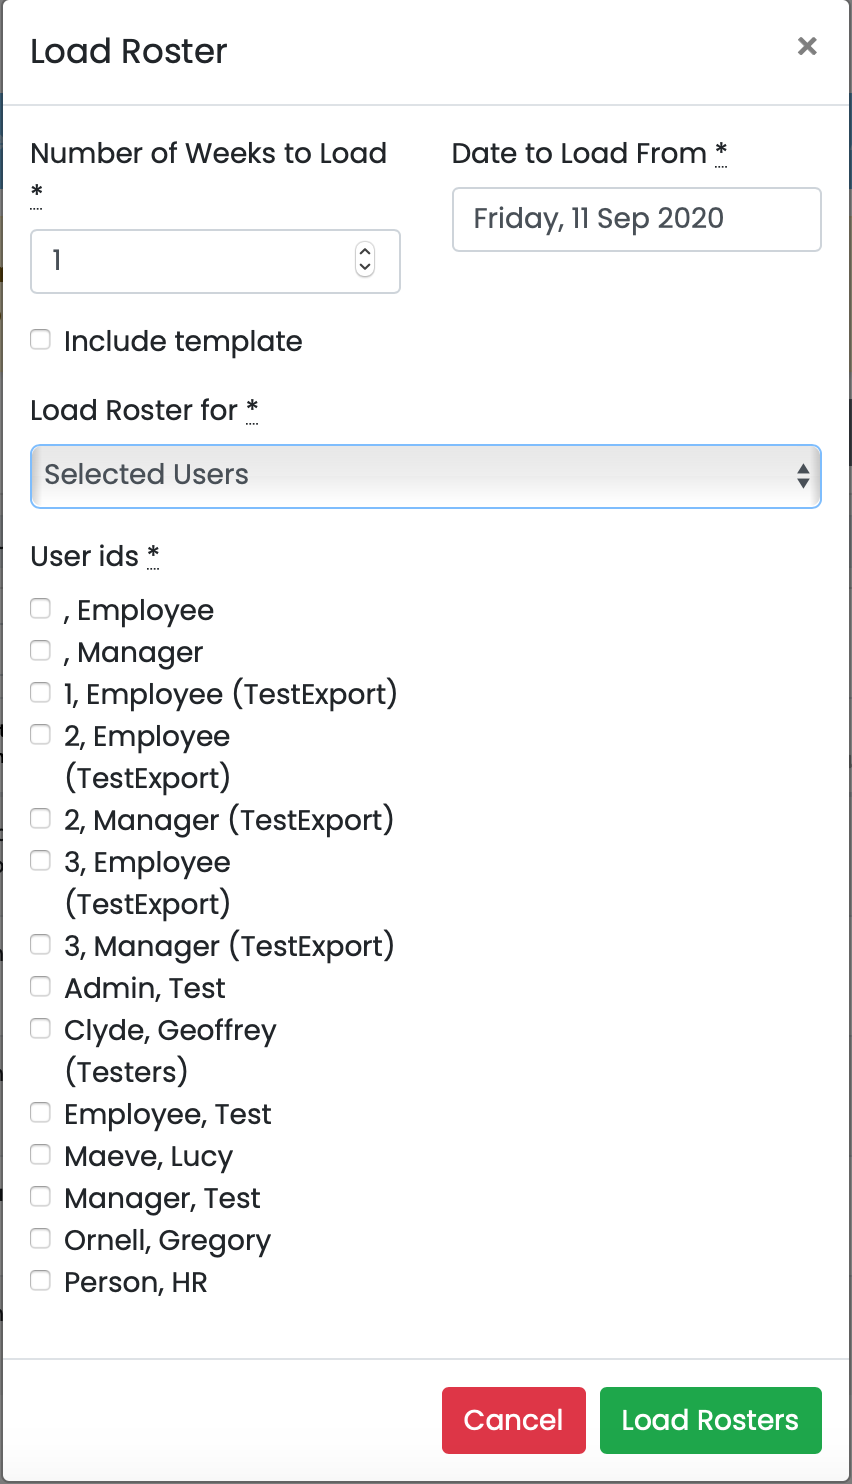
Load Roster:
If your company has an importable roster set up from the payroll side, you can click on this button and it will allow you to pull information from a roster directly from your payroll, for specific users. In the screenshots below, you'll see three different options.
- Loading the roster for everyone on the portal.
- Loading the roster for a specific team.
- Loading the roster for a specific user.
You can also choose how many weeks forward you want to load the roster for, as well as the date that you want to load the roster from.
|
|
|
|

Load Template:
As mentioned before, when creating a new timesheet, you can save it as a template for later. That is what this is for, you can click on the load template button and you will get this screen. This has the same functionality as the above roster loading, you can select between everyone, a certain team or individual users to load a template for.
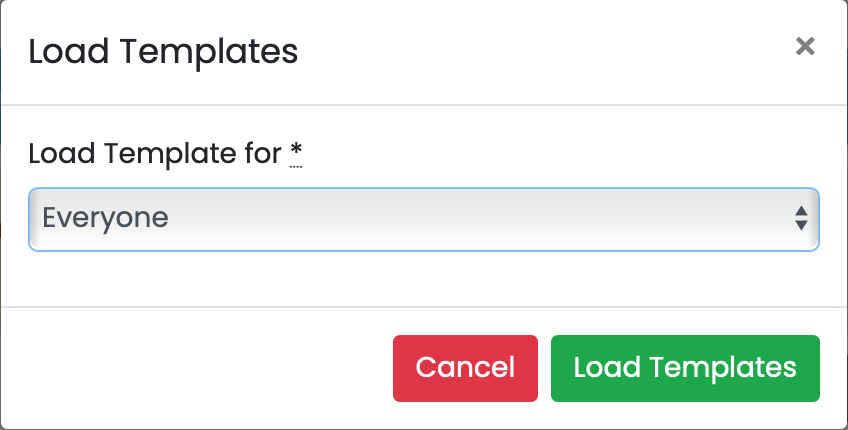
All you have to do is choose a selection that you want to load, then click on the load templates button, this will then compile all of the templates made for that selection and bring up for easy access.
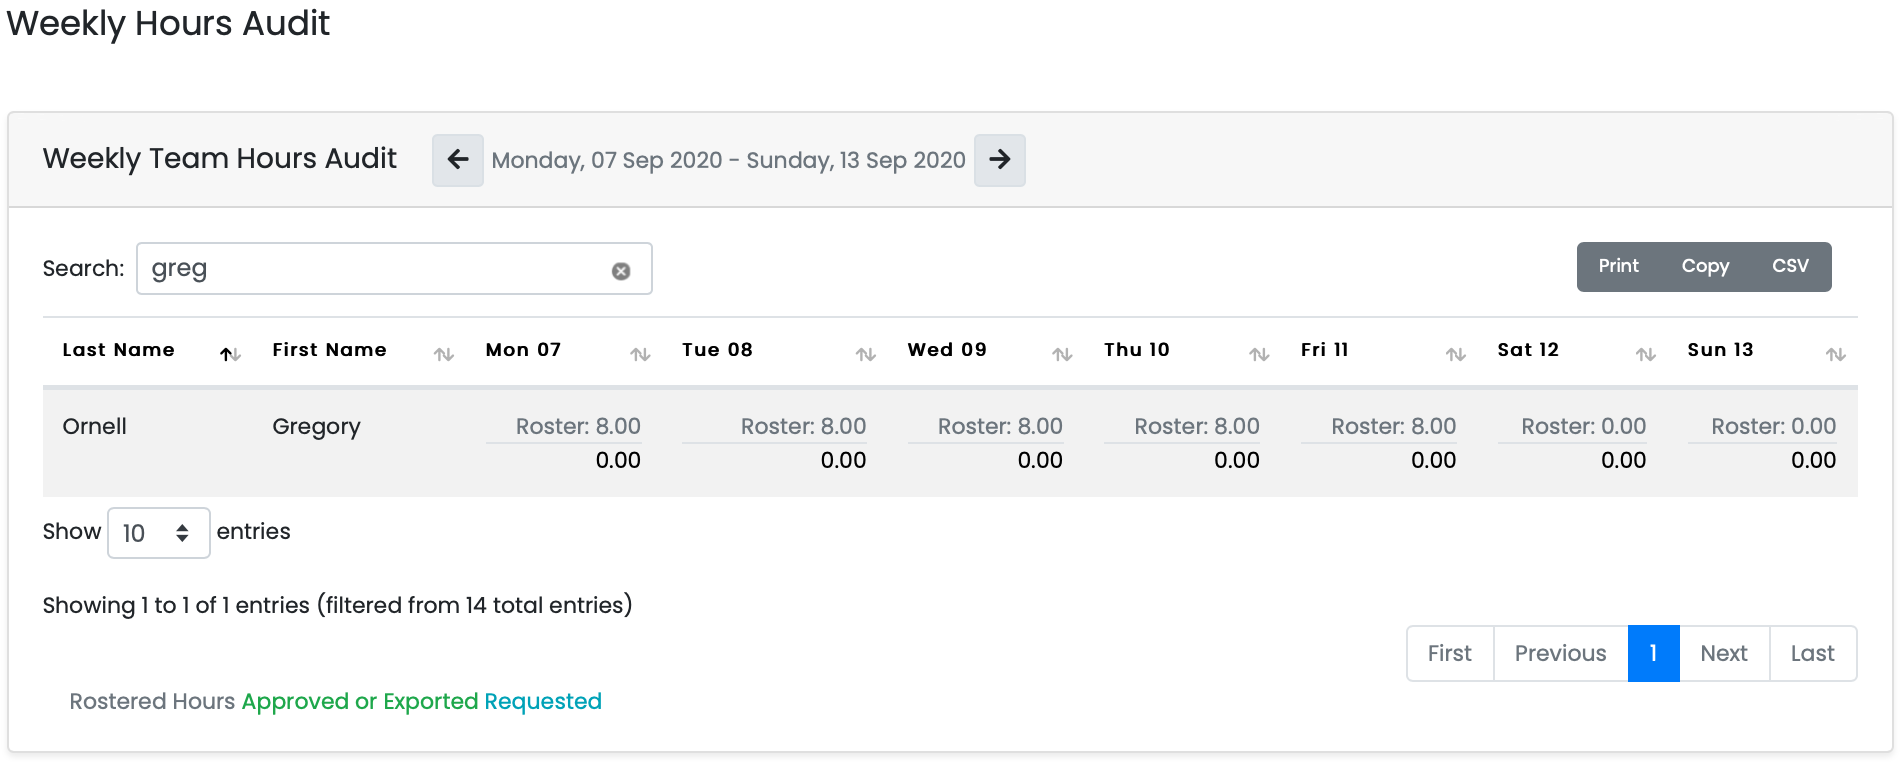
Hours Audit
The weekly hours audit is a visual breakdown of everyone on the portal's hours. The usual list will detail all users, but in this example, this shows only a single user. You can see how many hours they work on what days, as well as commissions, overtime, etc, if those have been worked or applied for.
You can also cycle the weeks if you would like to.
Pay Advice
The pay advices screen is where you can see all of your payslips in one place. It features a search bar if you need to find payslips from some time back as well as being displayed in an easy to read fashion.
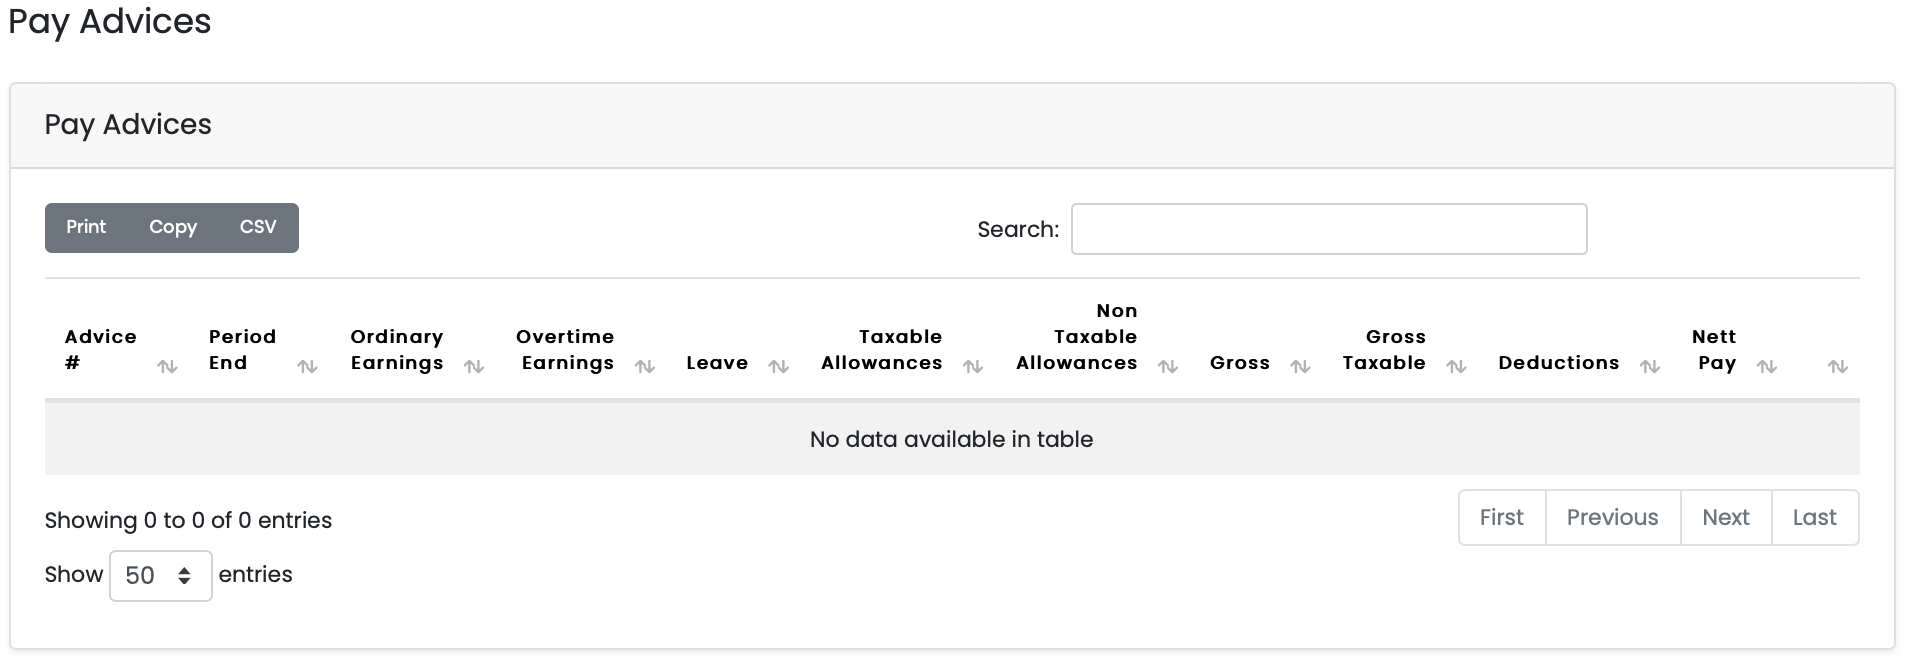
This table will list all payslips in chronological order from your most recent until your first, however this can be switched by clicking the small arrow icons next to the columns. This also shows you your earnings, leave and taxable allowances.
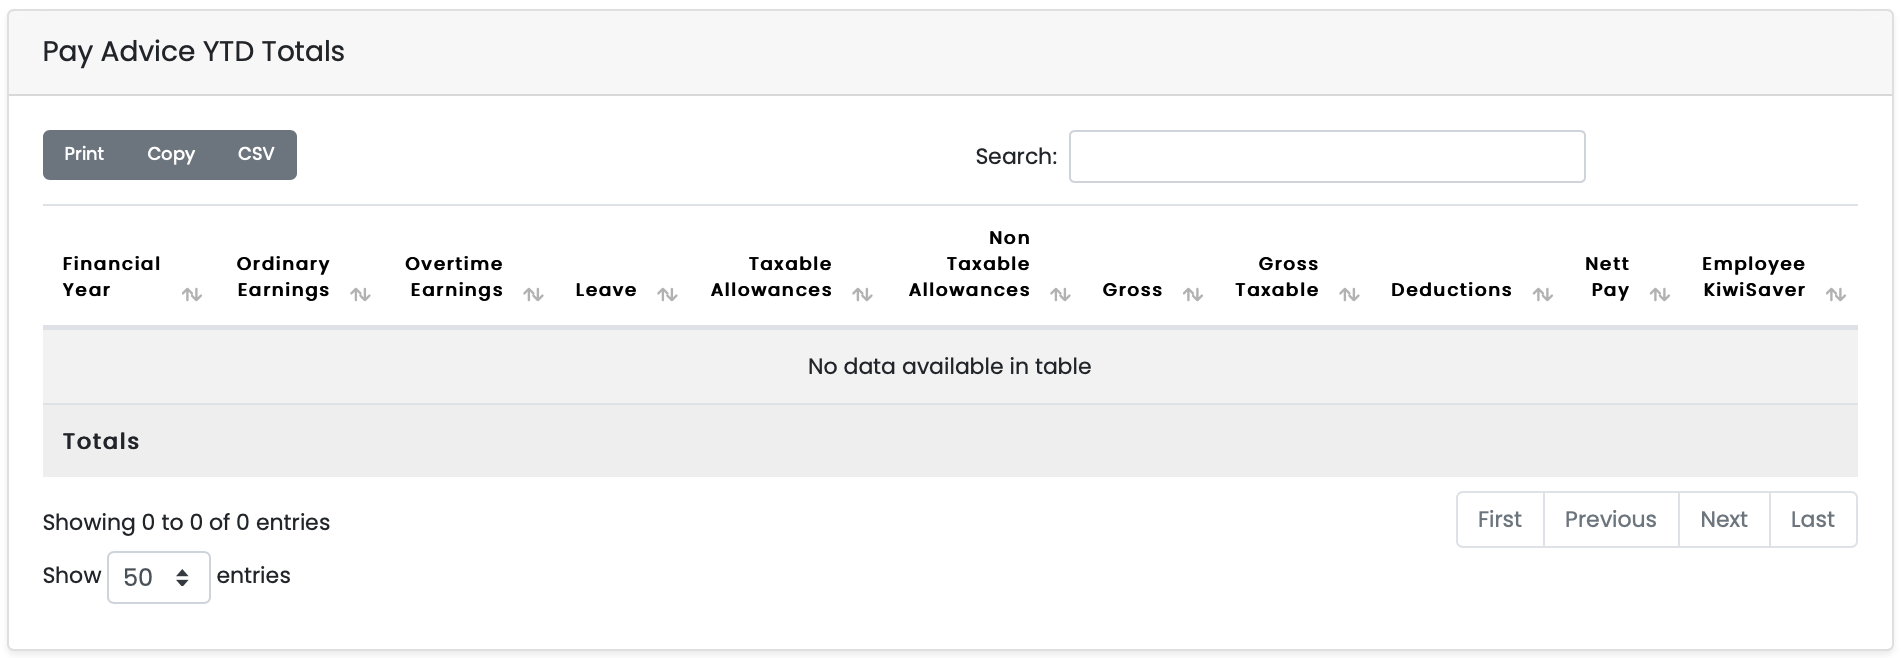
This table is your Year-to-Date totals, this table shows you the total amount you have earned from your first payslip right up to your most recent, as well as just showing you a variety of your total earnings, including KiwiSaver if you are included in that, since the date you started with the company.
Administrator Reports
HR Dashboard
The reports section of the portal is your all in one location for seeing all of the information regarding leave taken, year to date earnings, payroll schedules, etc. Below are all of the sections of the reports page, broken down into chunks to make it easier to understand.
The first three screenshots are all the individual segments of the HR dashboard, it is important to know that only HR admins and bureau users are able to see these reports.
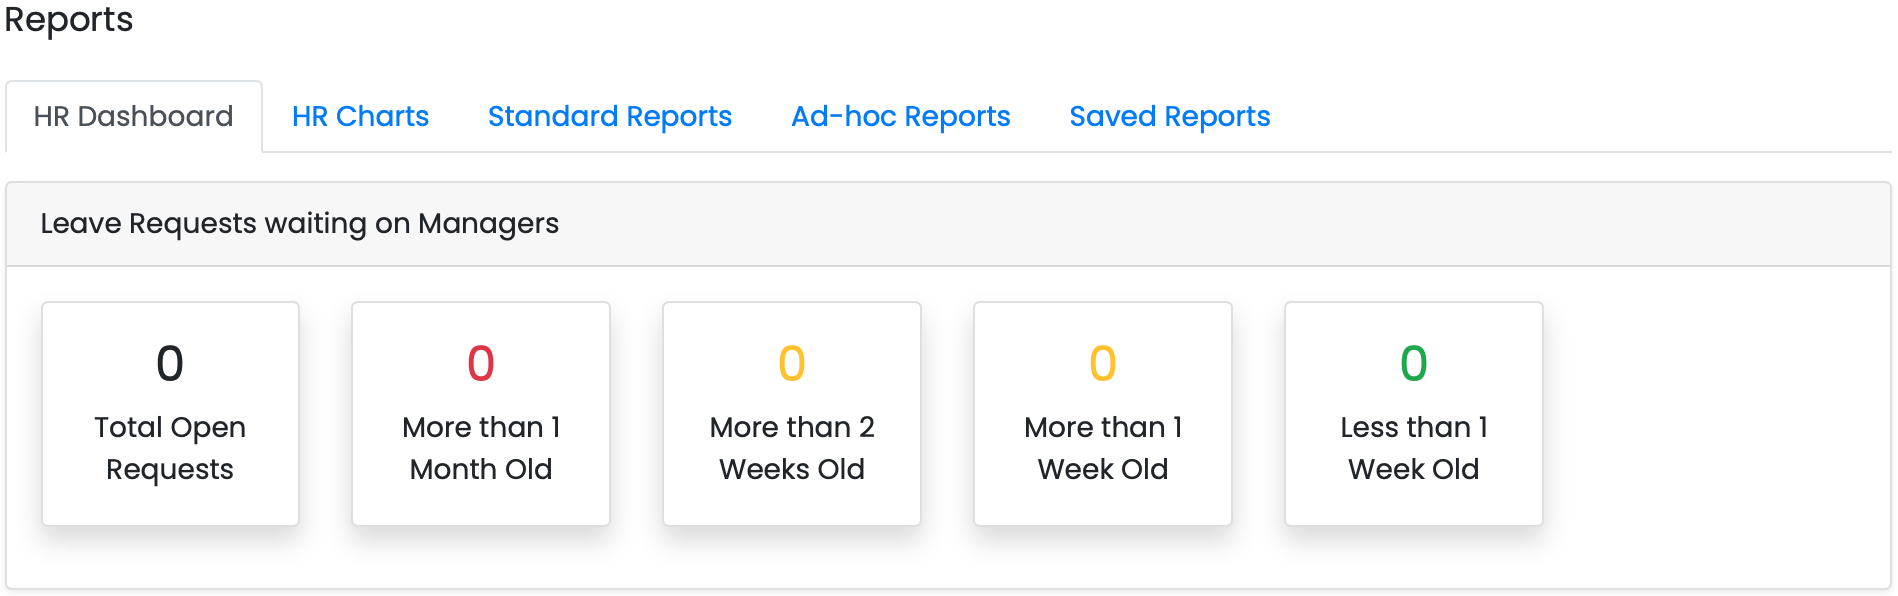
- This first segment is a simple breakdown of leave requests that are waiting to be approved, this way you can see who needs to be followed up on in regards to moderating leave requests. It also shows you 4 additional tabs at the top, HR charts, standard reports, Ad-hoc reports and saved reports, these will be detailed further below.
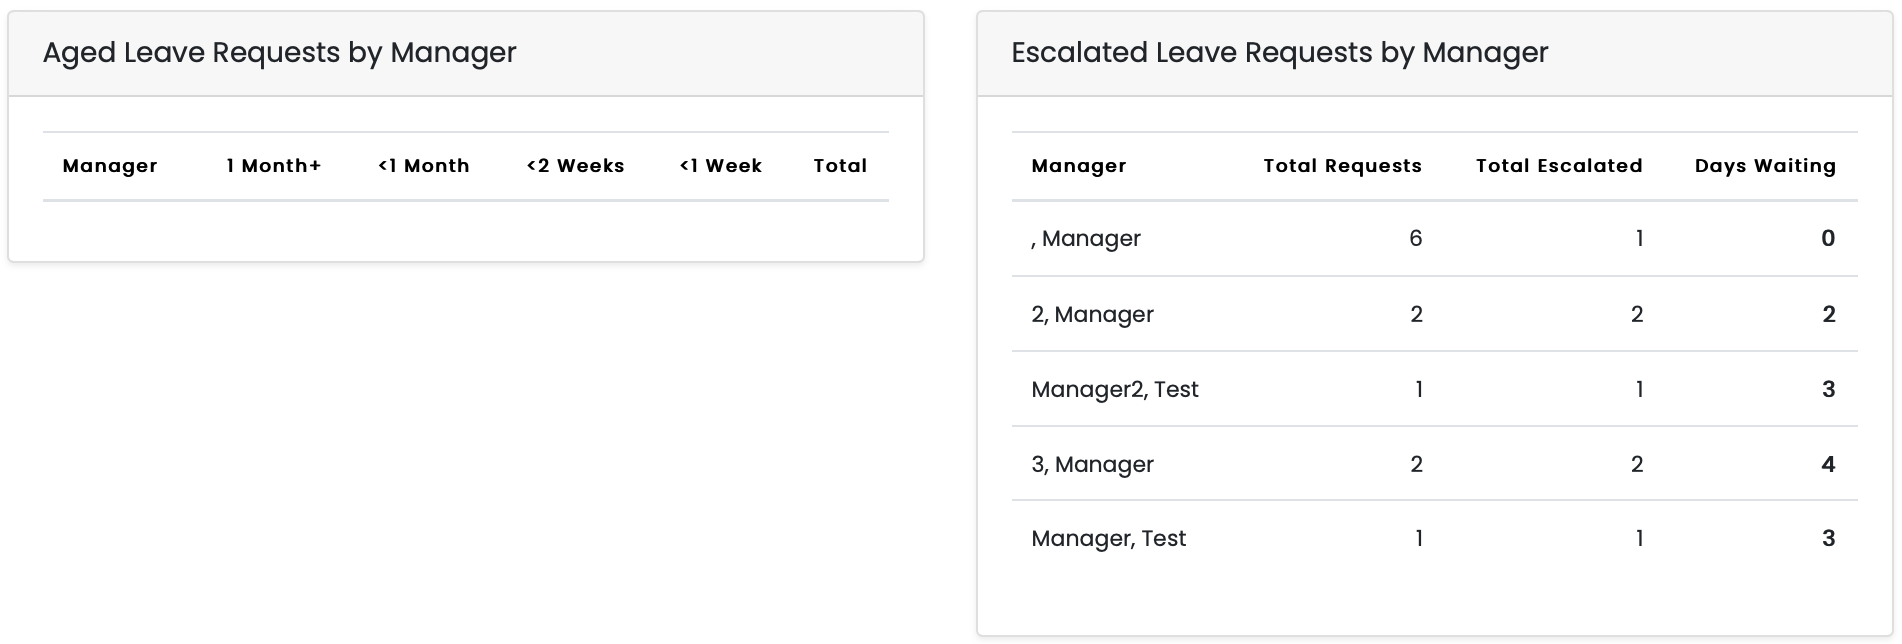
- This next segment will detail aged leave requests, this shows leave requests that fall into time ranged categories, from less than one week, up to over one month. Also in this segment, is escalated leave requests, what this does is show you a breakdown where leave requests have been escalated through managers due to lack of notice of leave requests.
- This shows how many there have been, how many times they've been escalated and the amount of days the request has been waiting to be approved.
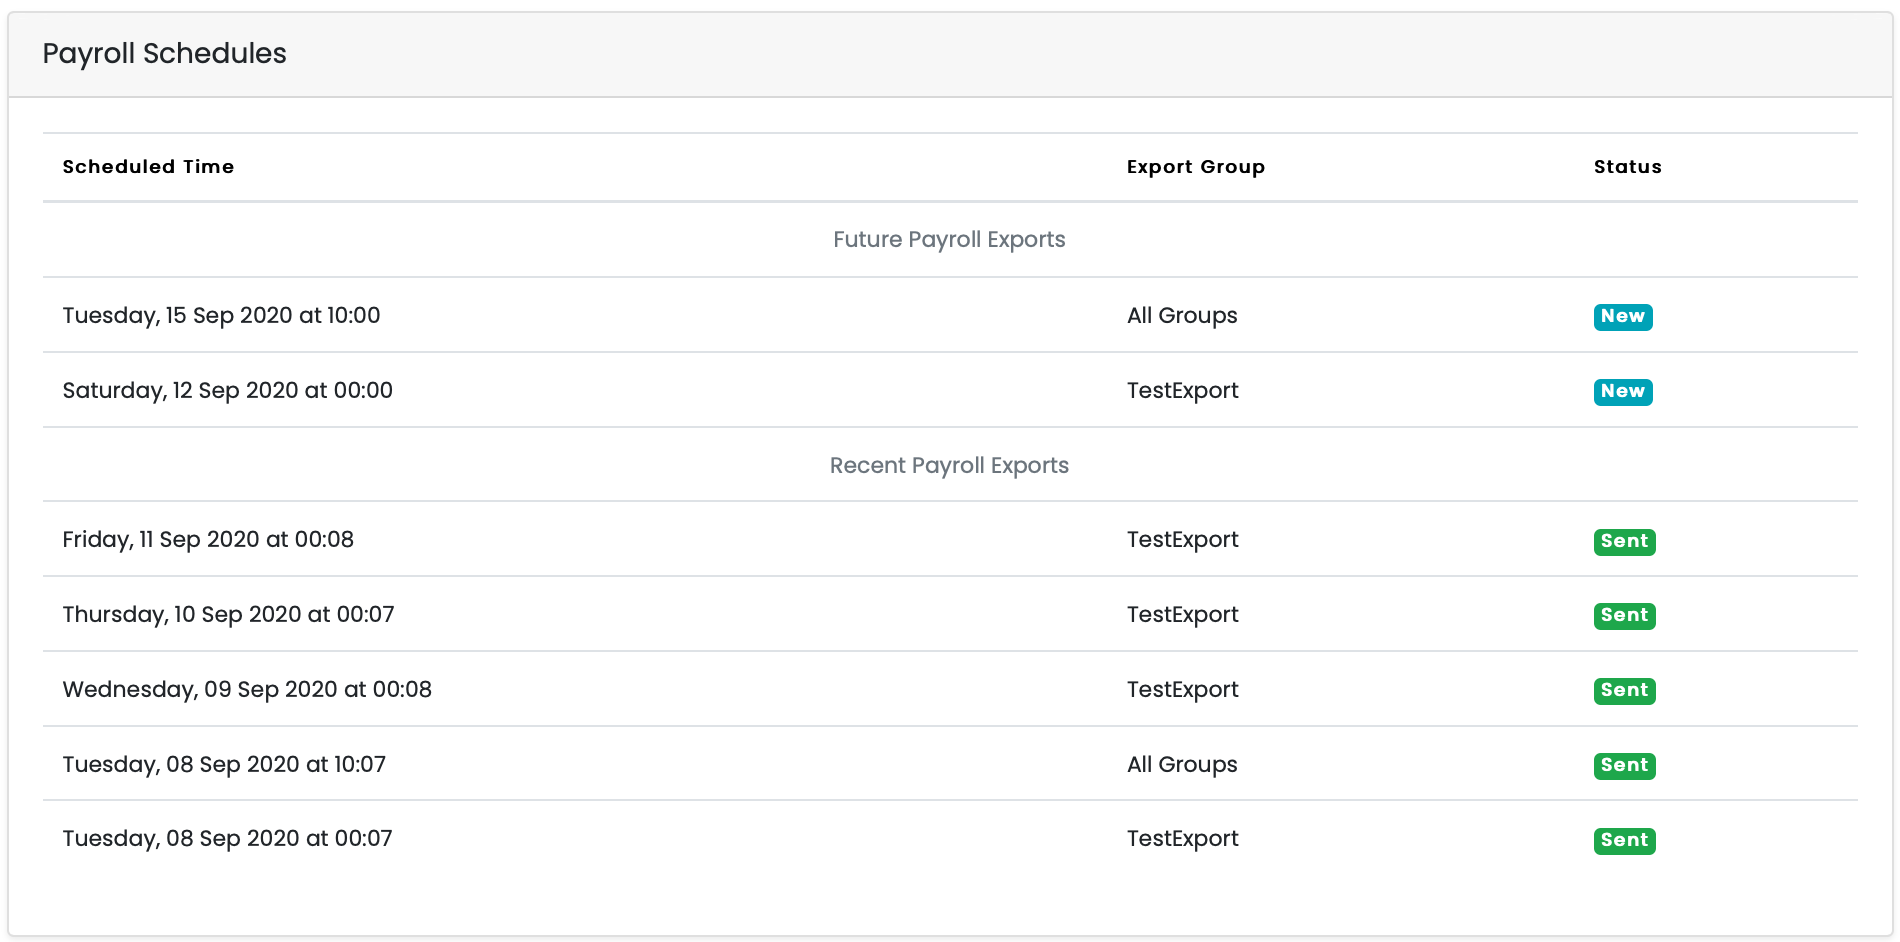
- This last segment shows you the active payroll schedules that are running from the portal. This includes the scheduled time that they run, from recent up to future schedules. This also shows you the export group they fall under, making them easy to categorise and the status of the schedules, whether they've been sent previously or if they're new (upcoming).
HR Charts
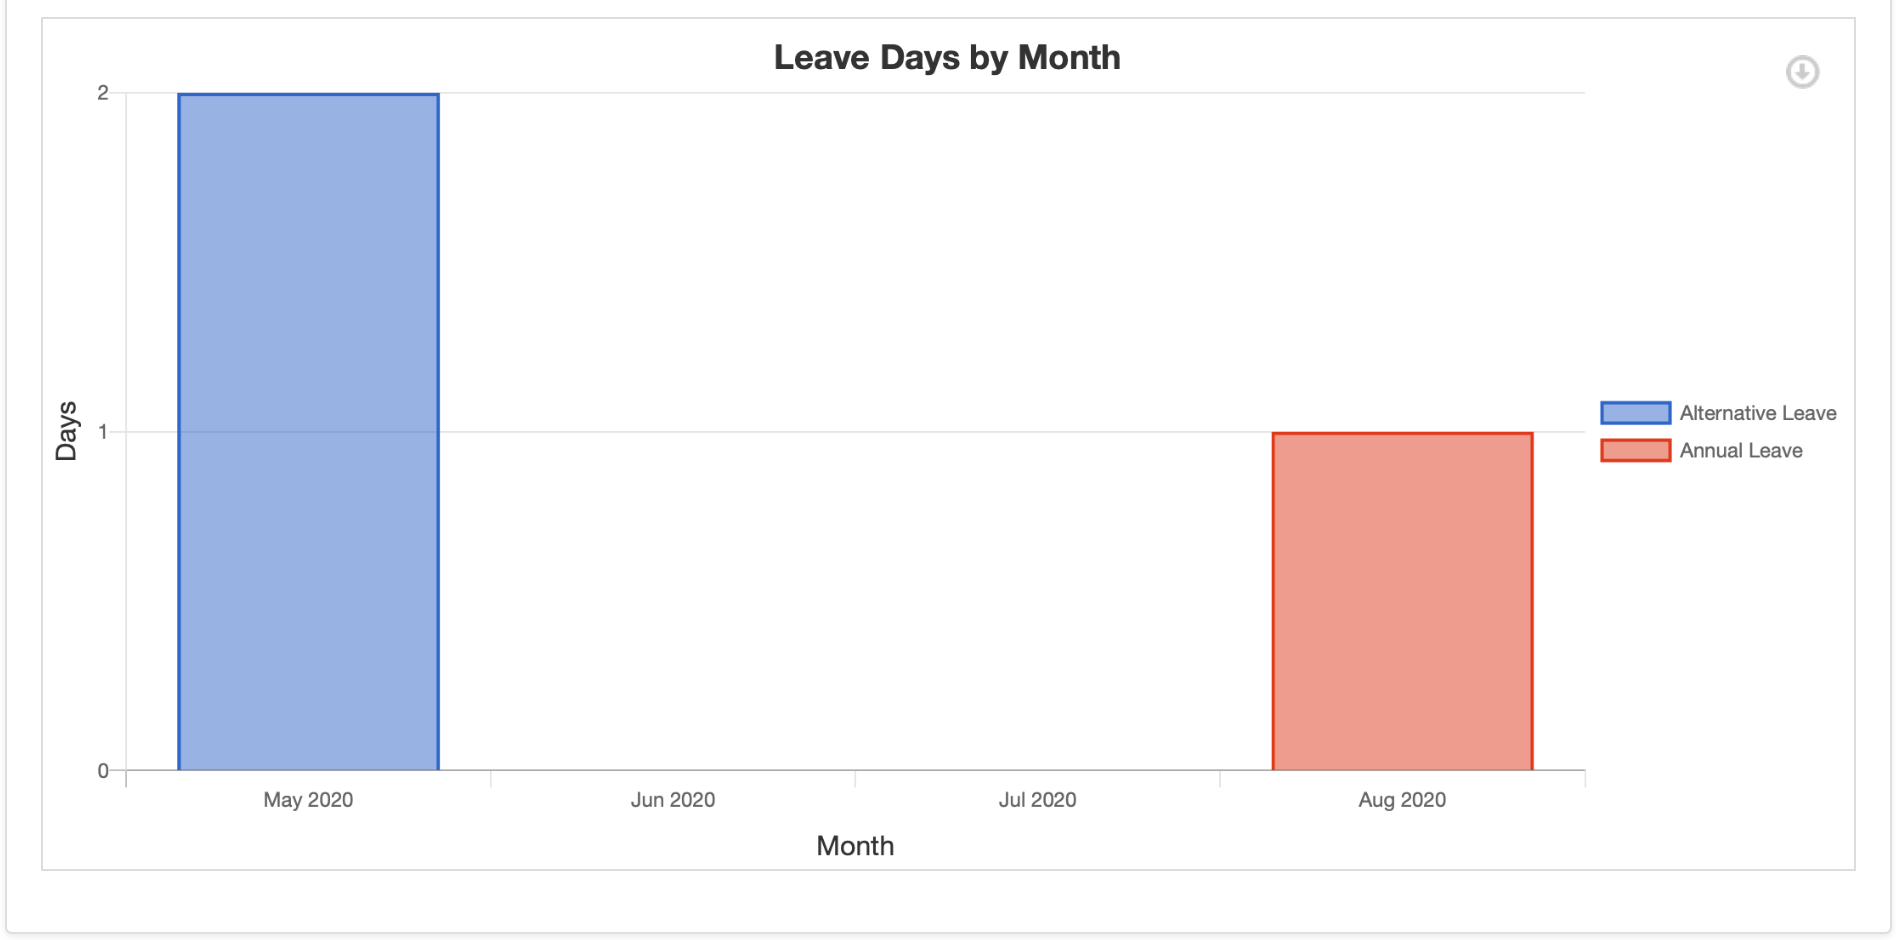
The HR charts page shows you a breakdown of leave taken each month in easy to read to charts, using large blocks and coloraturas coding each to make it easy to identify how much leave was taken in each month, as well as what leave it was.
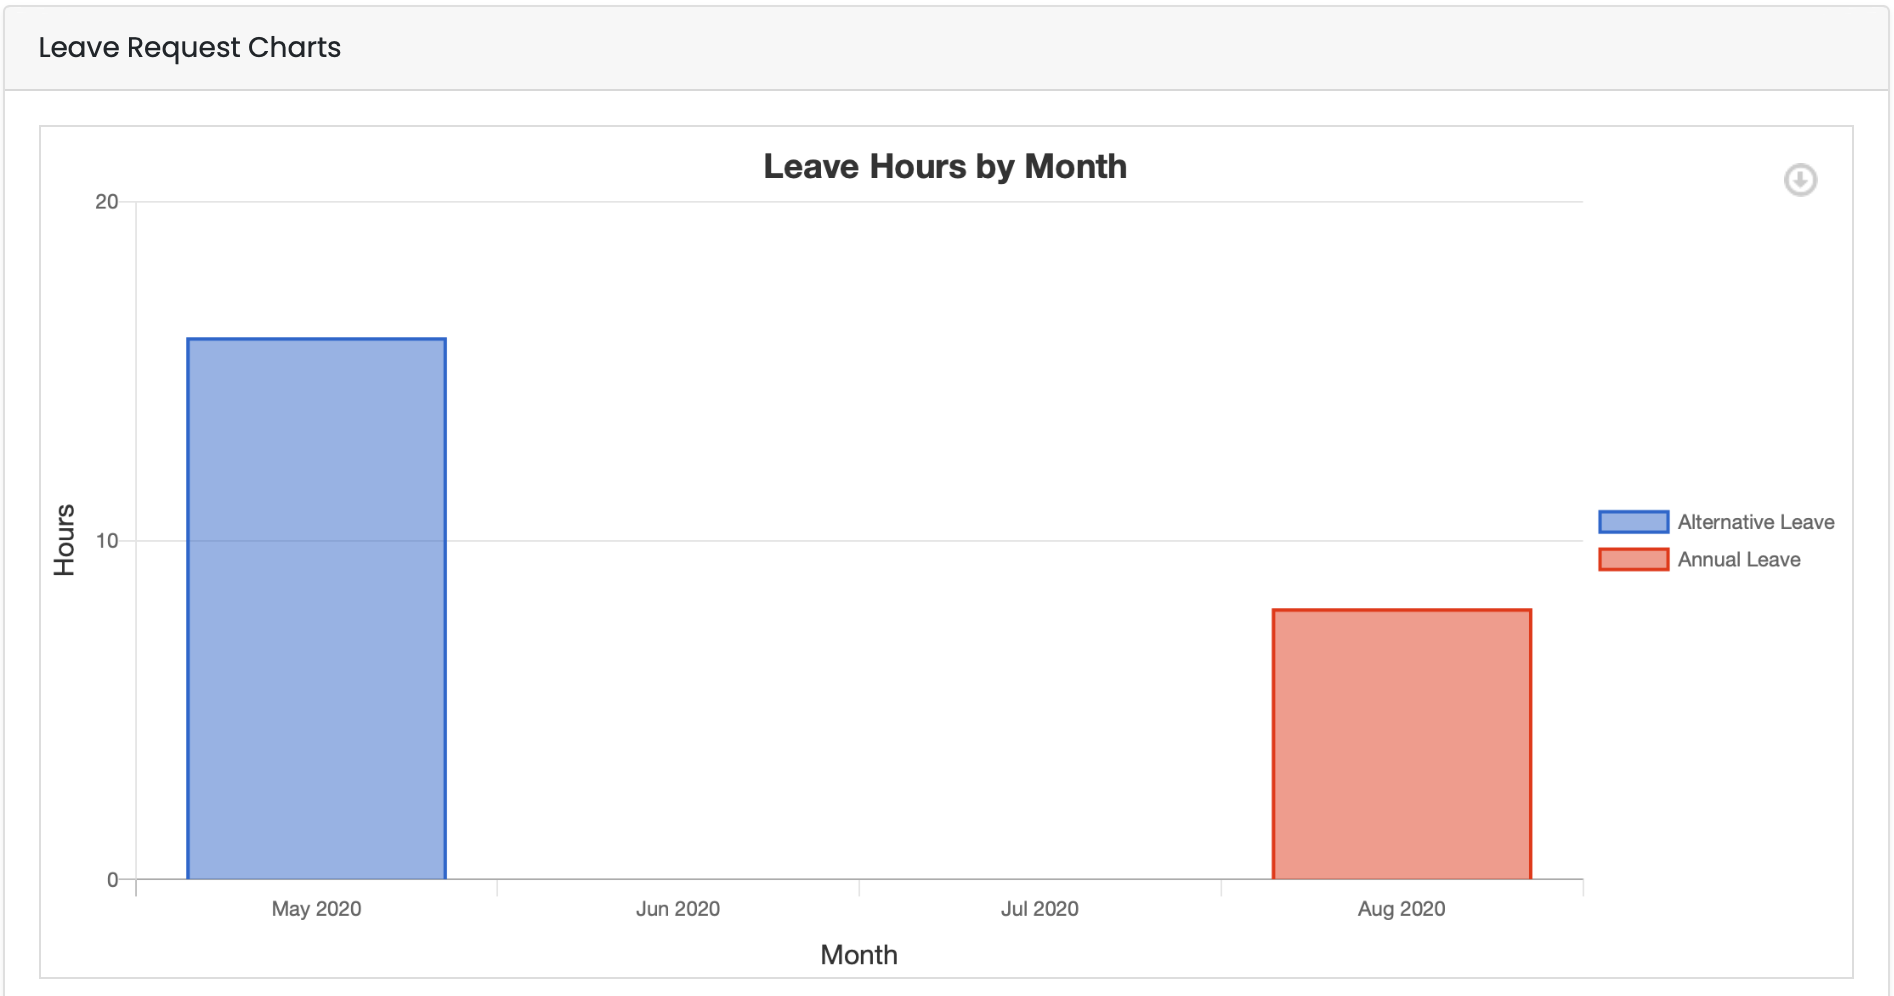
- The top box is a breakdown of leave, over the months, shown in hours, the colour coded boxes indicate which leave was taken.
- The lower box is also a breakdown of the same leave, taken over the same months, the only difference being that this box is broken down into days taken, instead of hours.
 Standard Reports
 Standard Reports
You'll notice that the standard reports page has two different options on here, Statement of Earnings and Leave Accruals. These both show you varying information. These will be detailed below.
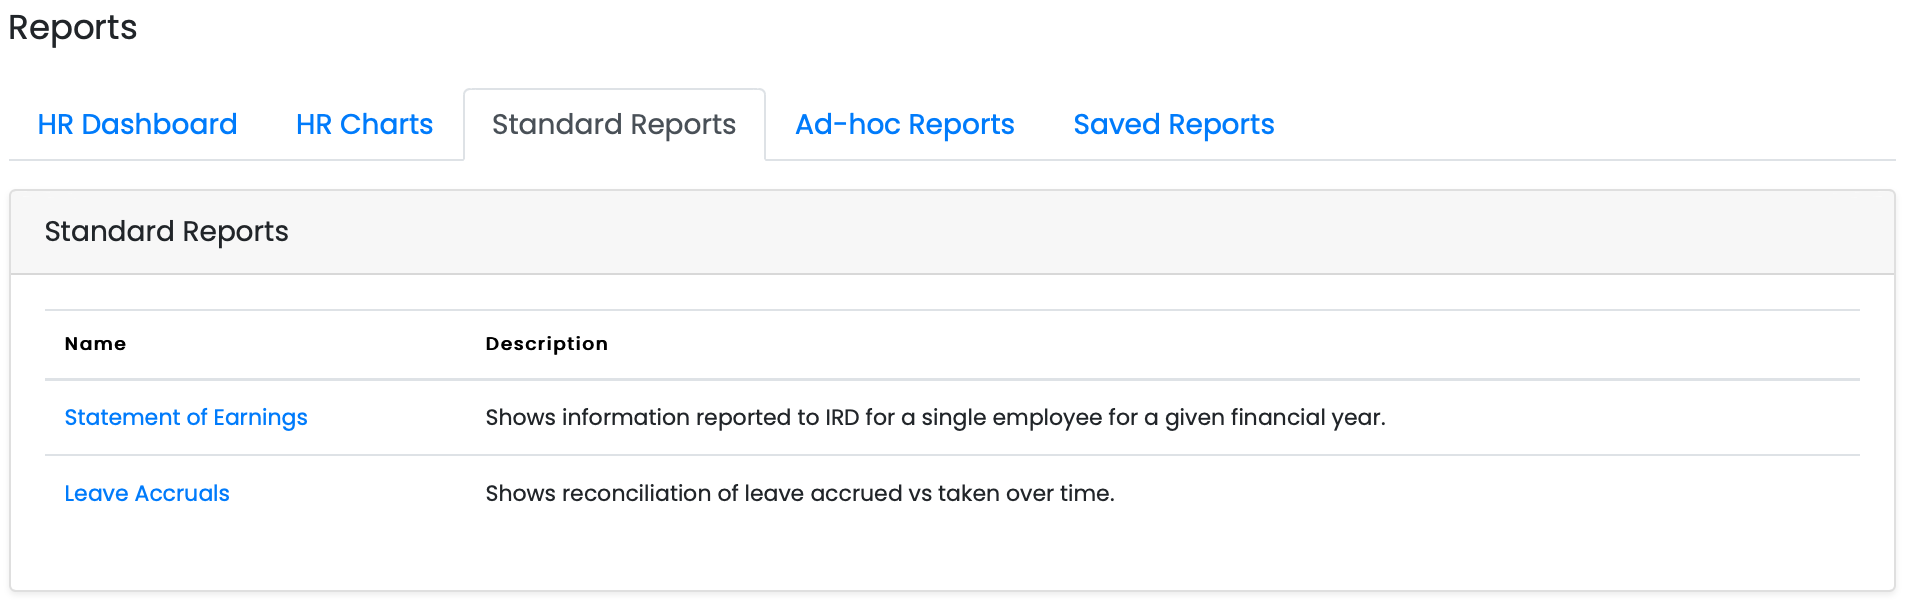
Statement of Earnings
The statement of Earnings report is a visual display of all of your earnings, all you need to do is select the dates that you want to show the statement for, once you have the dates selected, click on the preview button to bring up the following screen.
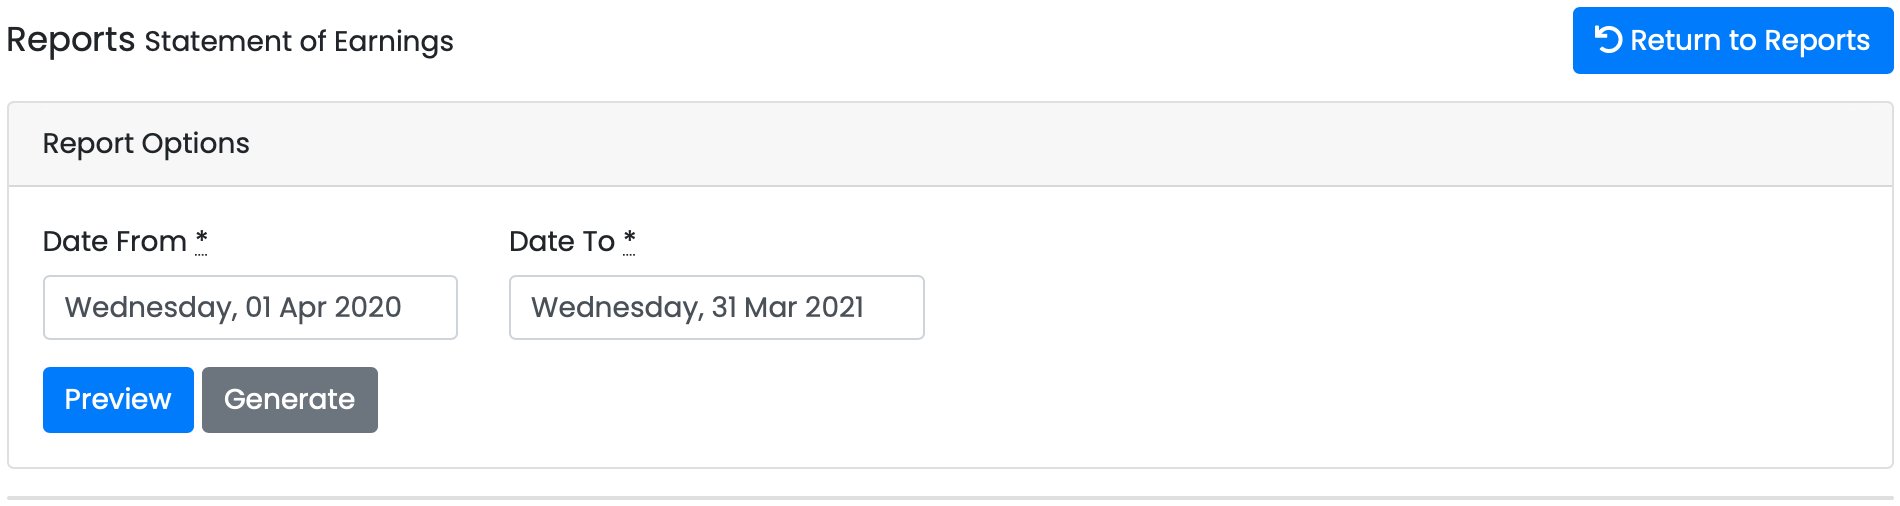
This screen is what gets brought up when you click on the preview button, it will sit just below the generate option, in case you need to change the dates. This page lists all of the monetary information regarding your employment, mainly all of your tax and PAYE information. It will be listed here, values will be located in the centre of the screen under the pay period date.
It is important to note that you can only generate statement of earnings reports for yourself, you are not able to see the reports of any other user on the portal, except for yourself.
 If you click on the button to generate the report instead of previewing it, it will be visible under the saved reports tab once the operation has been completed.
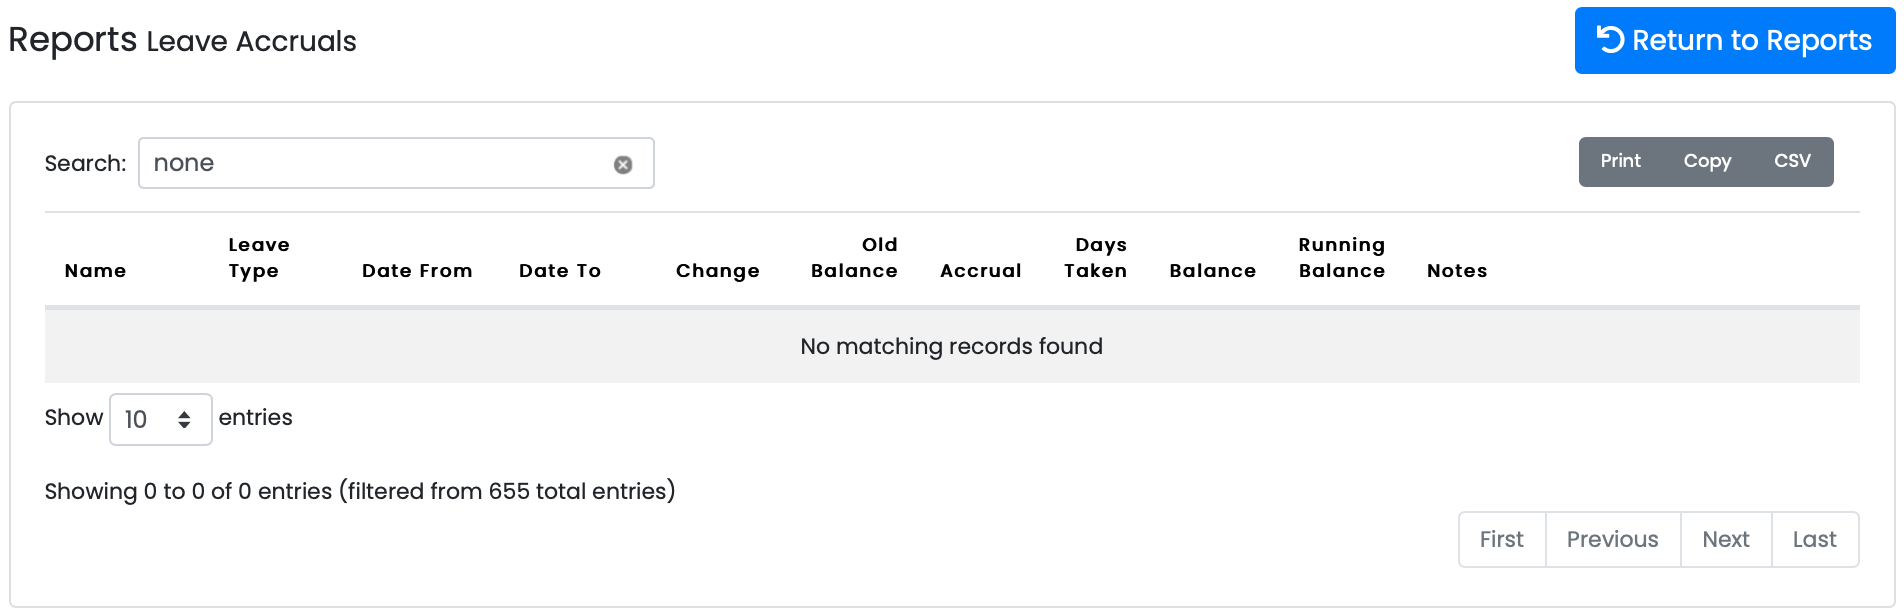
Leave Accruals
The leave accruals report will list every time a user has taken or requested leave on the portal, and will display it under this report. You will be able to see the name of the user who requested the leave, the type of leave, the date range of the request, balance of remaining leave, etc.
Once you are done with this page, simply click on the return to reports button at the top to return to the previous page.
Ad-Hoc Reports
The Ad-hoc reports screen is where you can get detailed breakdowns of all the individual segments of the portal from leave requests to user data. There are four subsections to use in the page, detailed below.
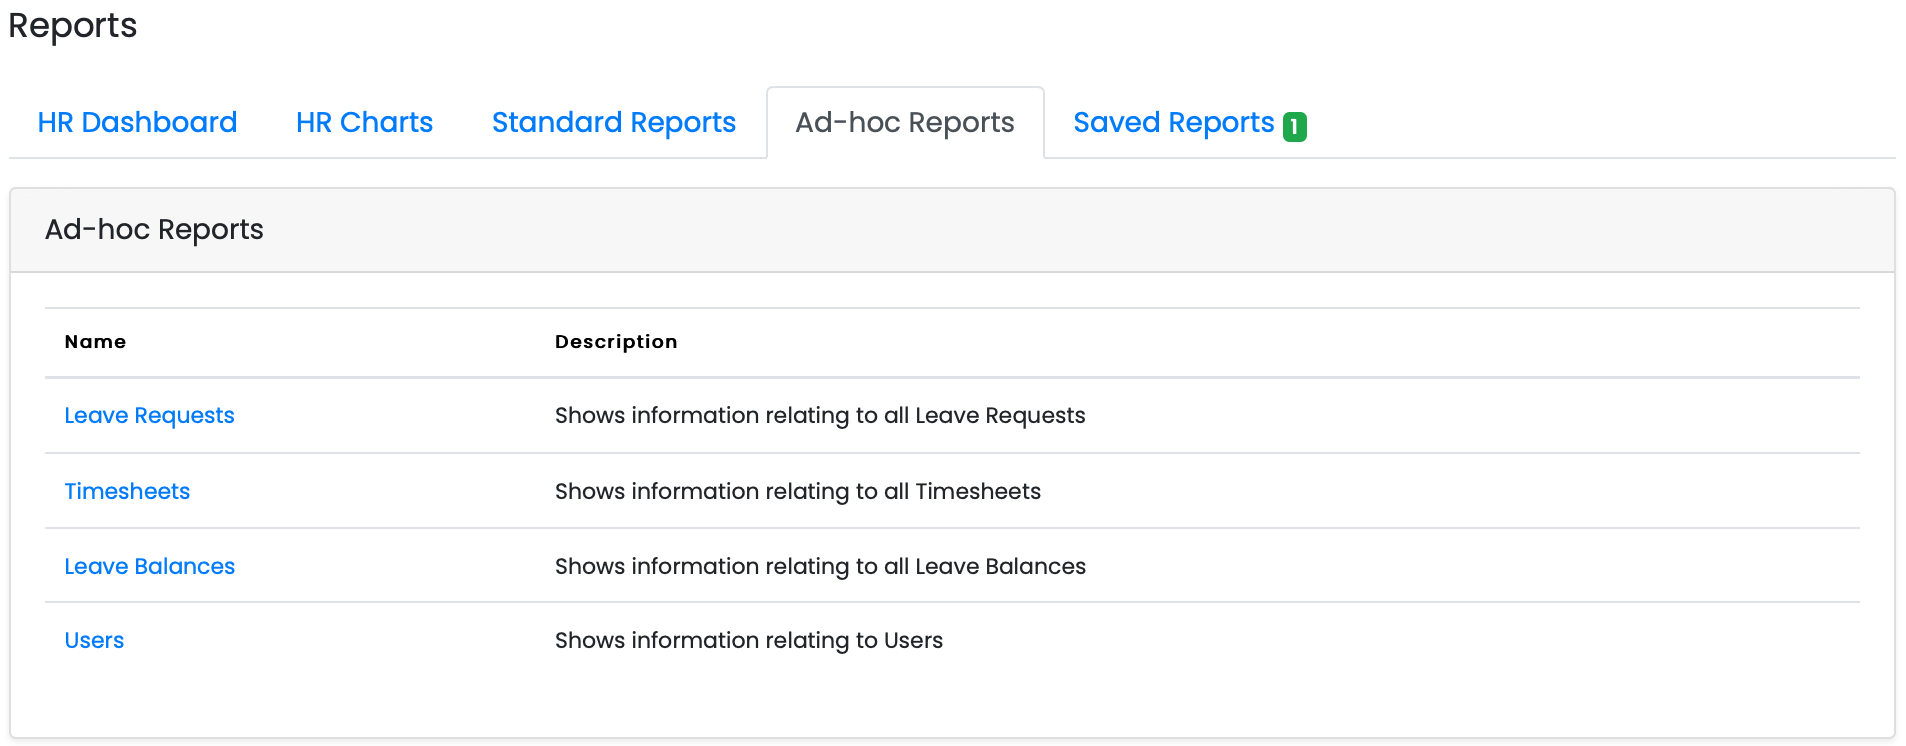
The following lines are detailed breakdowns of each of the four subsections, they all also contain a detailed filtering system, which looks like this:

This filter system is used for searching for specific people or transaction types, or even a mix of both. There are several other options here, all in all, designed for finding whatever you need as easily as possible.
Leave Requests
This segment of the reports will detail all of the leave information regarding all users leave requests, such as, what leave was requested, whether its been paid, how many hours/days were used, etc.

Timesheets
This segment of the reports will detail all of the timesheets that have been completed or applied for on the portal, this will show you who applied for the timesheet, the leave type, what type of timesheet it was, status, such as template, draft or new, etc.

Leave Balances
This segment of the reports will detail all of the portal users leave balances. You'll see everyone who has leave available, what type of leave they have and how much they have.
 Users
Users
 Users
UsersThis segment of the reports will detail all of the portal users. You'll see their names, payroll codes, work area, email address and other information like when the last time they logged in was.

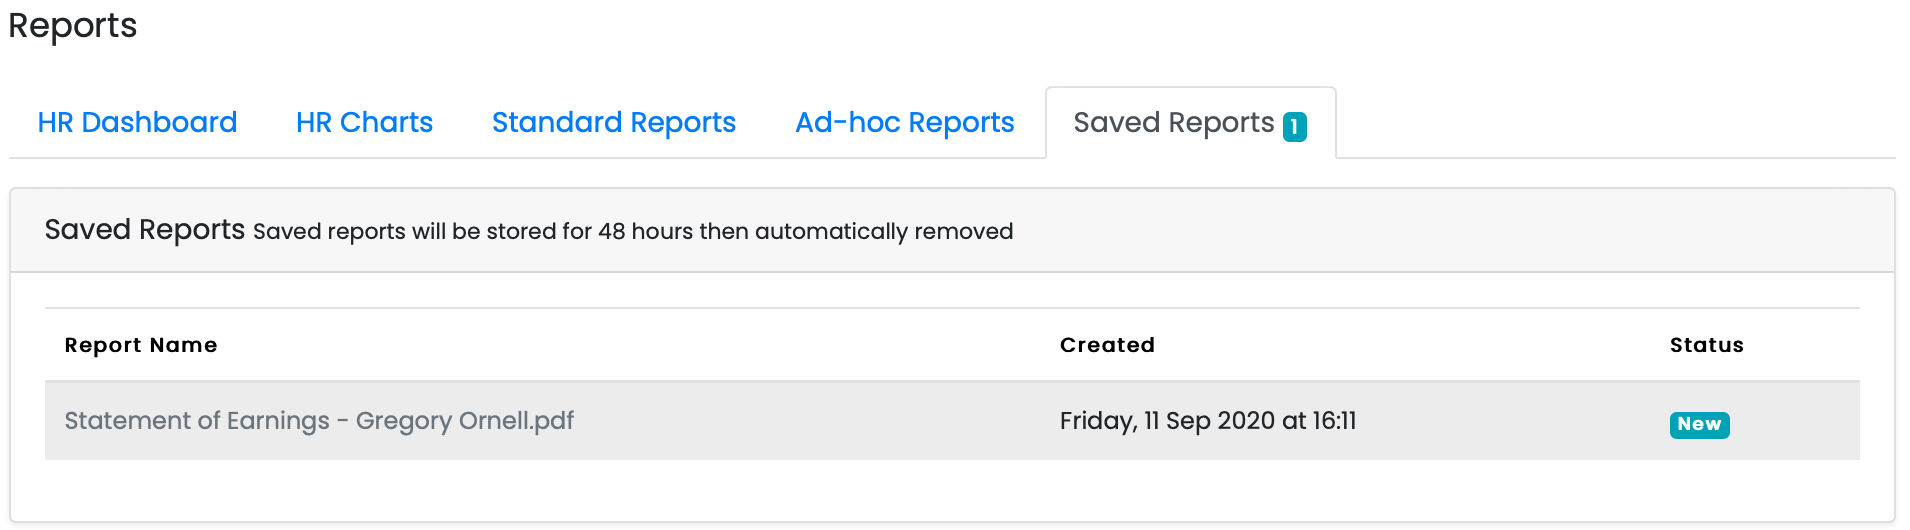
Saved Reports
This tab is where you will see reports that have been generated, for example, statement of earnings. However, reports that are here, are not permanent. Any report that has been generated will be removed from the screen after 48 hours.
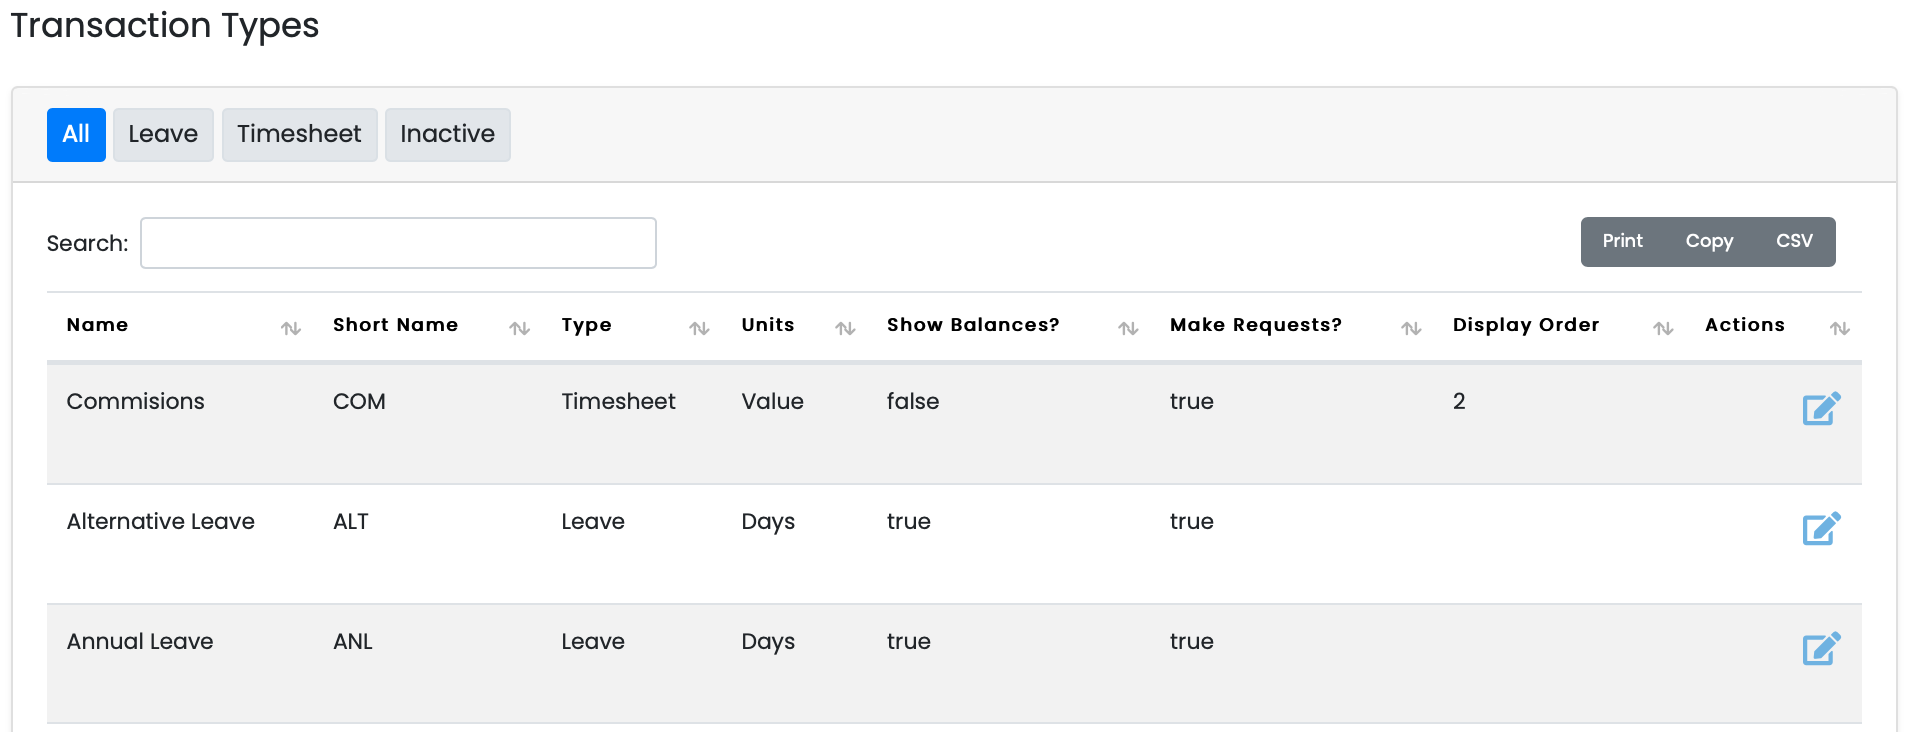
Maintaining Transaction Types
This is the transactions screen, here you will see a list of all available transaction types and whether or not they can be applied for or if they have a visible balance. This also measures the units in which the transactions are calculated in.
As an administrator, you will be able to edit these transaction types, but you will not be able to create new transaction types, that option is limited to bureau users.
Editing a transaction type
To edit any transaction type, click on the pencil icon on the right, this will move you to the following page.
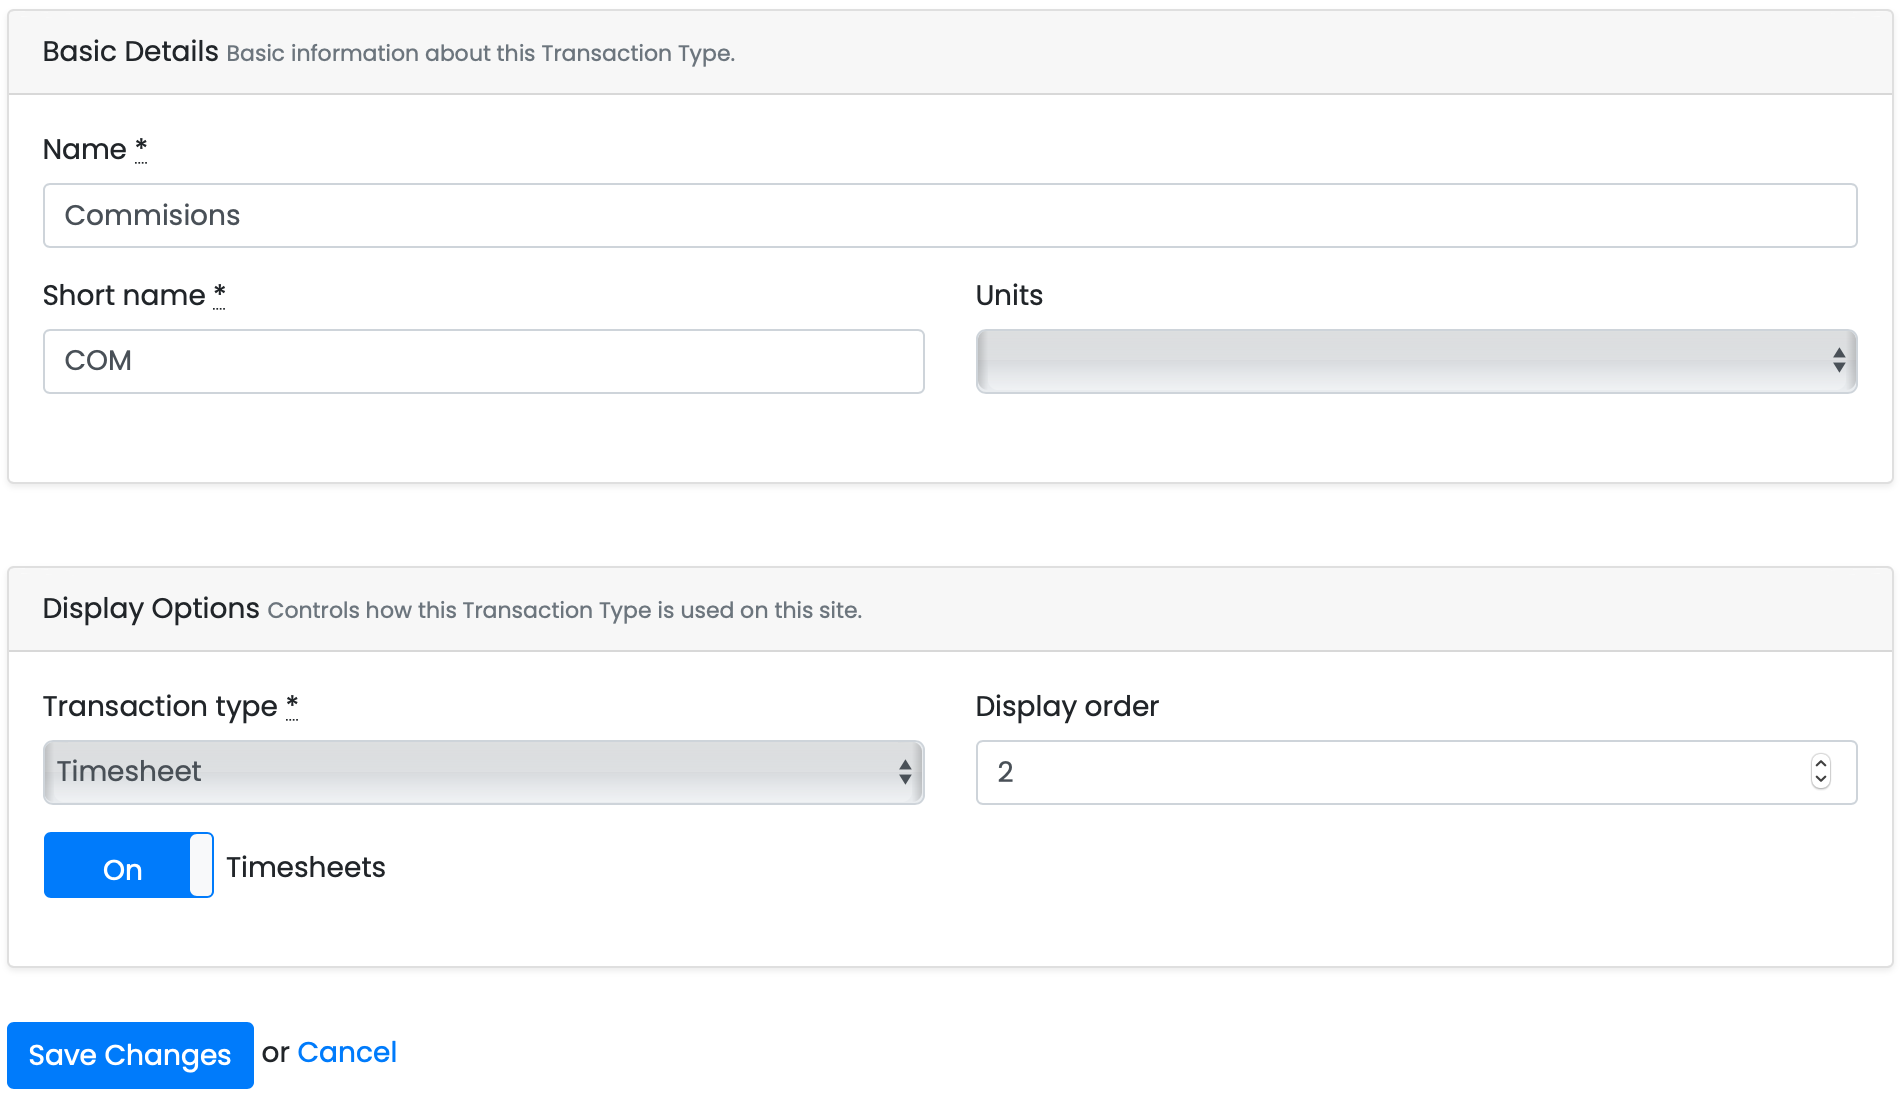
On this screen you will be able to change the name, short name and the unit of calculation, and you can change the display order. You can also set whether this can be applied for through the timesheets page.
Once you have made any changes you needed to, click on the save button at the bottom and will update accordingly.
Exporting Files
This screen allows you to manage export files being sent from the portal to your payroll. You can manually check all current requests here and if they are ready, export them to your payroll system. Any exports currently being run on the portal can also be setup as an automatic schedule. The exports screen looks like this.
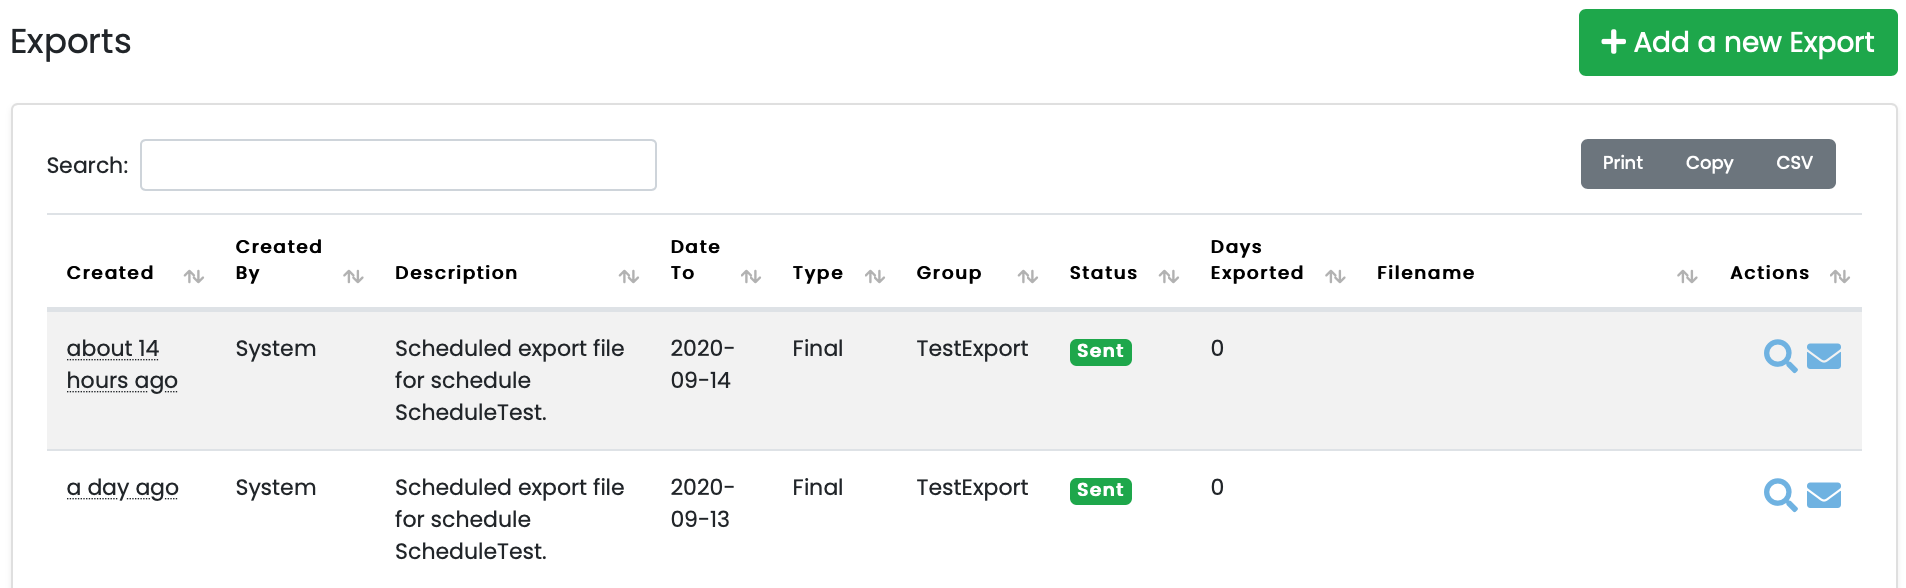
You'll see what created the export file, a small description, the date to that it was running for, group name, etc.
Creating a new export
To create a new export file, click on the green button in the top right corner, this will bring you over to the following screen.

When creating a new export, you have a few fields to fill out, there's the basic details.
- Enter the date that you want the export to run to
- Enter a filename, this helps to identify the file
- Select the type of export this will be, ie, draft or final
- Select the export group this belongs to
- Enter a short description, also helps with identifying the file after the export has run
You'll also see another small box at the bottom, this is for letting you know if there will be any leave requests or timesheets running through the same period as the export.
When you have done this, you can click on either review or send. Review will let you see the export before it is finalised, and send will send the export away to be completed.
Setting a Company Message
On the portal, you have the ability to create multiple messages to show up across the site. These messages can be tailored to specific people or can be addressed to the entire portal. This feature is only available to HR Admins and Bureau users.
Creating a New Message
In order to create a new message, you will need to click on the company messages button which is located under the gear icon next to your name, this will bring up a new page. Once you are on this screen you will notice a large list in the centre of the screen, this will contain all of the messages that have been created.
In the top right corner will be a green button, this will redirect you to where you can create a new message.
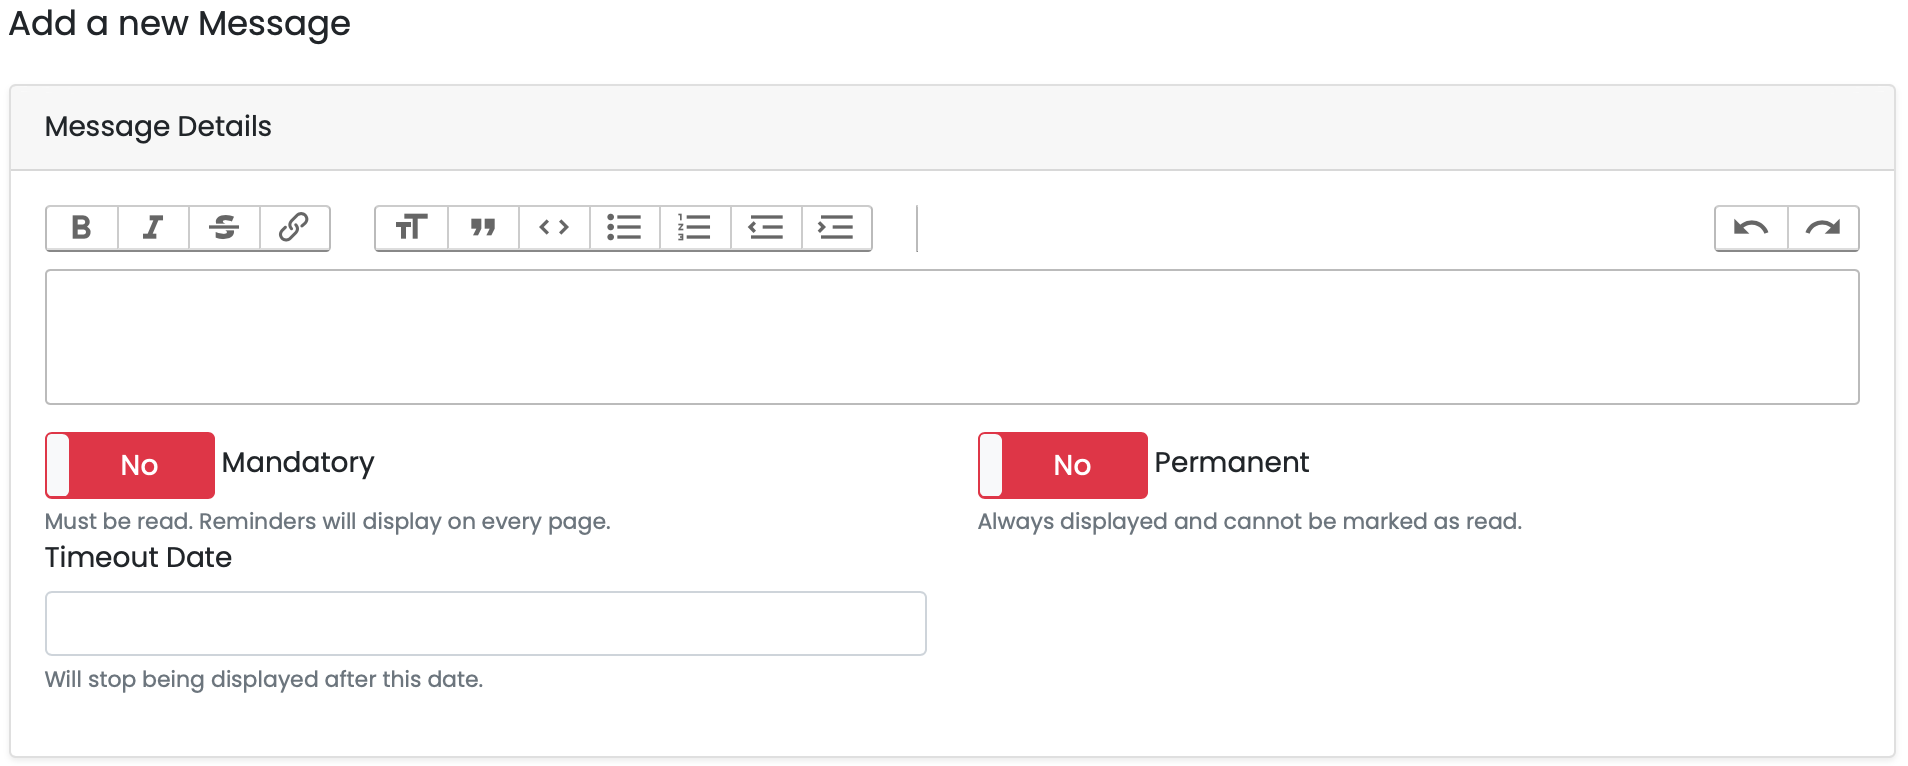
Here you can enter in your message, and you can also customise it with text tools along the top.
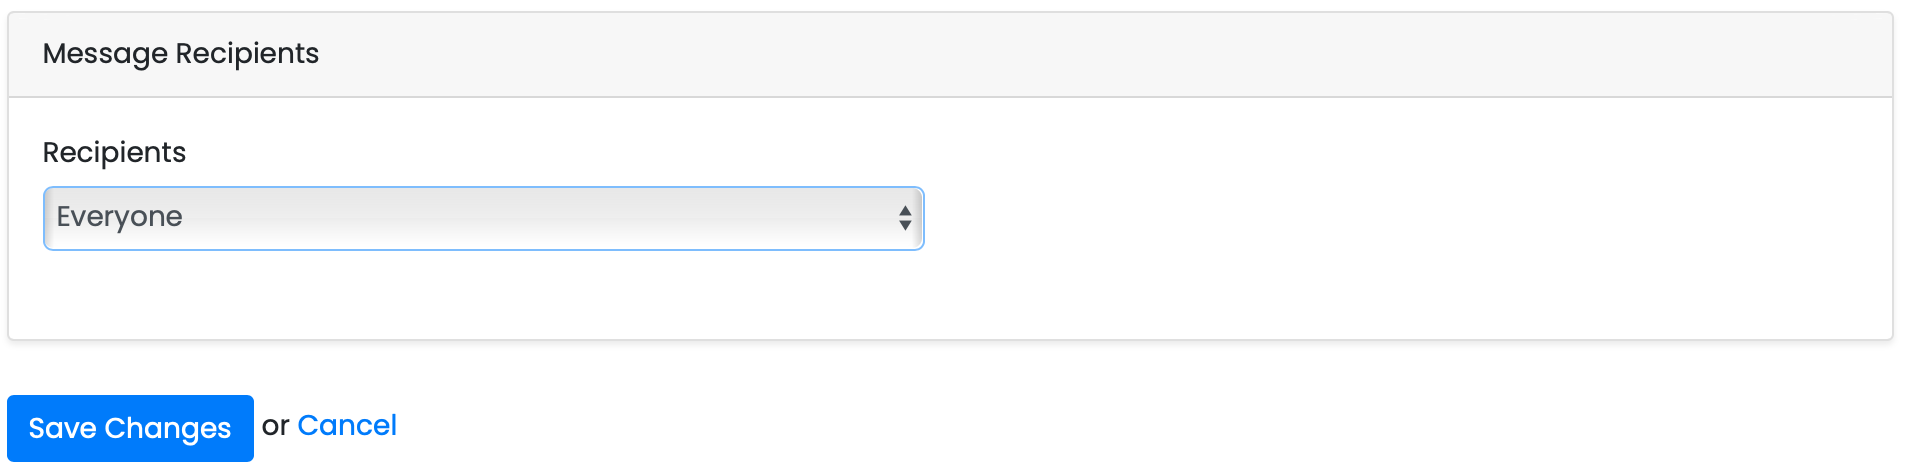
Once you are done, select the users that you want to be able to see the current message, then click on save changes.
Once you have clicked on the save changes button, anyone that you have selected to be able to see this message will be able to see it on their dashboard the next time they log in.
Message Maintenance
With the messages, when you have read them, you can select 'Mark as Read', this will update an additional checklist under the original message, for admins and bureau users, which will show you who has and hasn't seen the message.